Sunday, December 23, 2012

Adding a Dual Red/Green Bow Light to your Kayak

   This is Part 2 of the "Adding a White Light to your Kayak" project. The kit mentioned in the previous project came with both a White LED Light (back/stern), and a Red/Green LED Light (front/bow). I made an adapter that mounts to my RAM mount under my Fishfinder. Since the dual color light came with the kit, I figured why not use it? I'd be happier knowing that I look like a small boat, rather than looking like a target out on the water.

   This kit by Attwood Marine, can be purchased at Wal-mart for $30, and intended to be used on smaller boats that didn't come equipped with navigational night lamps. 


* * * NOTE: Each state is different concerning lights on a small vessel, which is mandated by the US Coast Guard. For most of us, a single white light will do. Your decision to use this light is solely up to you. And, for those of you who will leave negative comments about this project, look at the packaging again, and take notice of the small jon boat (8-10 ft in length) pictured, noting that the angler is anchored with both the white light at the back and the dual red/green light up front. He sits no higher, or lower, than we do in our kayaks. Using the dual Red/Green lamp DOES NOT mean one has to be moving! * * *


    Parts List:
   ( 1 ) Attwood Portable Navigation LED Light Kit - $30
           Attwood Marine's Portable Navigation LED Light Kit

   ( 1 ) Piece of Aluminum Plate 1/8" thick x 6" length x 4" wide

   ( - ) Misc. Marine Grade Fasteners - (i.e. bolts, washers, nuts)


Here's how I did it:

1.) I used a piece of scrap diamond plate aluminum for this project.

You may want to use a piece of plate that is flat on both sides. Check with your local town garage for some scrap road signs that have been run over or mangled.


 2.) I used my RAM mount piece to trace out a rough design to incorporate the size of the piece that I need to use.

I marked out where I need to drill my holes.


 3.) Though it's not shown, I used a C-clamp to hold my RAM mount base in place so I could drill my mounting holes straight and keep them aligned perfectly.


 4.) With all the holes pre-drilled, I clamped down the plate so I can cut out the piece.


 5.) I used a Saw-Zall with a fine tooth metal cutting blade. Carefully, cut the out the design piece while keeping the saw's blade straight.


 6.) * Not shown: I used a Die Grinder to cut off the remaining piece behind the plastic fish finder mount.

I then used a 3M grinding wheel to remove the burrs from drilling the holes, the sharp edges from cutting out the plate, and rounded off the corners and edges.

I then mounted the parts in place.


 7a.) Shown from the left, with the unit on.


  7b.) Shown from right, with the unit on.


 8.) Shown mounted on my kayak, from the right, with the unit on. (yes, the kayak is upside down)


   Just a final note:  When this piece is mounted in place, you won't be able to open the forward hatch. But when you're sitting on the water in total darkness, you won't really have a reason to go up there anyway. I usually leave the RAM mount slightly loose, so I can turn the whole unit sideways, if I have to fetch something in the forward hatch, if I have to.

Saturday, December 15, 2012

Adding a Orange Flag to your Lighted Safety Mast

   In a earlier post, I showed you a way to make an inexpensive lighted safety mast. This is yet another way to increase your safety out on the water - especially if your fish in the saltwater.

   While the lighted safety mast works great at night, this article will help increase your being more visible during the daytime hours, as well as being more visible at night.

   One way to do that, is to add a bright orange safety flag to your mast, to aid in being more visible during deep ocean swells, and motorized boaters from a distance.

   The club I fish with in Rhode Island highly recommends that a safety flag be used on ALL club outings.

   Starting with the Lighted Safety Mast that was featured in my last article, I will show you how to add a bright orange flag to your lighted mast.


   Parts List:

   ( 1 ) 18" x 18" Orange Vinyl-Coated Nylon Flags w/ Staffs ( 2 pk.) - $7.68/pr.
           2 pk of 18" x 18" Orange Safety Flags w/ Staffs

   ( 3 ) 3/32" x 2" long Machine Truss Fasteners - $1.18/ea. ( 4 pk. )
           4 pk of Machine Truss Fasteners

   ( 3 ) 3/32" Stop Wing Nuts - $1.18/ea. ( 6 pk. )
           # 8 Wing Nuts


   Depending on your skill level, this project shouldn't take longer than 30 minutes.

   Let's begin:

   1.)  You can find this "Safety Flag" in the safety section of a Home Depot store. It's approximately 18" x 18", a highly visible orange, and sells for under $20.

   * * * NOTE: The flag pictured was purchased at a different store, but the kit install is still the same.


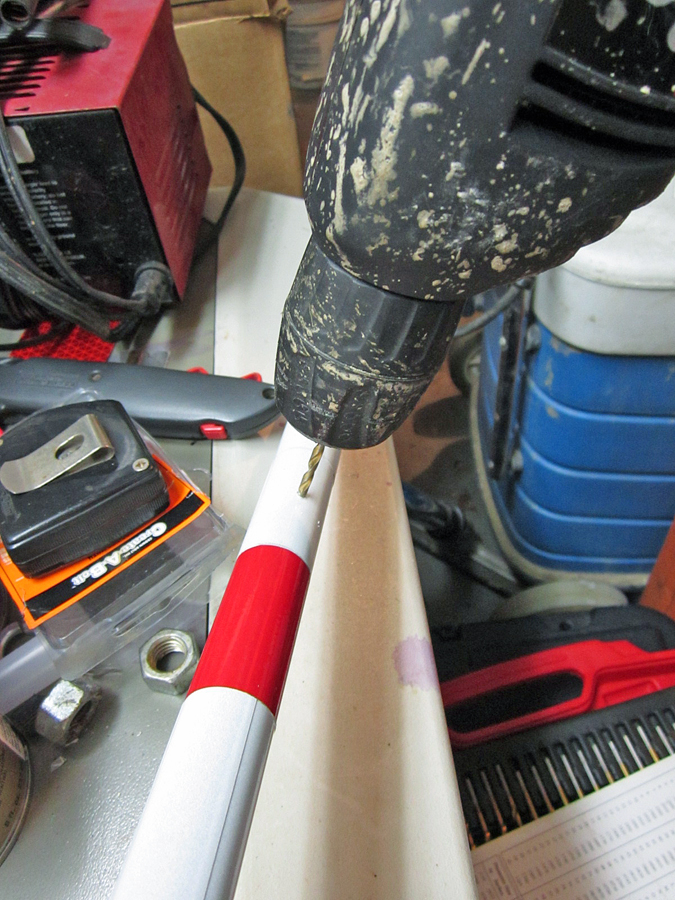
   2.) Be sure to have the flag extended outward, and carefully mark 3 areas under the flag along the wooden dowel to drill your holes, making extra sure that the holes you intend to drill are centered correctly. Because the dowel is round, you may have make a "flat spot" on the dowel so your drill's bit doesn't wander while drilling the hole.


   3.) Using a 1/16" drill bit, carefully pre-drill your 3 holes straight through the center of the dowel as best you can. These will act as "guide" holes for the larger 3/32" drill bit after you're done with these.


   4.) Now, in the same 3 spots you used the small drill bit, use a 3/32" drill bit to enlarge the holes. Be careful not to drill the holes off center or the dowel may split and break.


   5.) Depending on your tools, I used small spring clamps to hold my flag's dowel firmly attached to the mast. Make sure the flag is below the top of the mast, otherwise at night, your safety light won't be seen with the flag in the way. You will need to drill through both the wooden dowel and the safety mast pole.


   6.)  I used 6 parts. I picked up ( 3 ) 3/32" x 2" long Machine Truss Fasteners and ( 3 ) Stop Wing Nuts. Push the ( 3 ) Machine Truss bolts through the safety mast and the safety flag staff. 


   7.) Attach all 3 bolts with the wing nuts.


   8.) This is what it should look like when it's done.


   * * * NOTE: This particular flag measured at 12" x 14". Because this flag doesn't show up in the Cabela's search, I substituted this flag for a larger 18" x 18" flag that can be purchased at Home Depot. The mast I used measured at 40" in length. Because the Home Depot safety flag is much larger, you may want to cut your mast to 50" in length, so that when the wind shifts in direction, the flag's bottom edge won't be slapping against the back of your head!

   
   This is the actual flag I made for a friend. She used it at Monahan's Pier in Narragansett, RI in August 2012. The swells got bigger as the weather slowly got uglier. It's nice to know you can now be seen with the added safety of a flag.


How to make your own Lighted Mast

   We all want to be seen out on the water. And that's a good thing. Just because some jerk got his boater's safety course certificate and passed, doesn't mean he rules the water. Whether you fish or paddle, freshwater or saltwater, you need to be seen out on the water so you don't become the next casualty.

   In this article, I will show you a way to make a good lighted mast. And, it won't cost you a bundle. I will include the price of the parts, where I bought the parts, the tools used, and how to assemble it.

   An excellent version out there is the Yak Attack VisiCarbon Pro. I have an older version with a orange safety flag that measures 10" x 12". The newer VisiCarbon Pro's orange safety flag now measures 4" x 12" - which makes it look more like a sock flapping in the wind. I think they're a little overpriced at $60 - $70.

   Adding a U.S. Coast Guard-approved White Light to your Safety Mast - For use on the ocean or saltwater ponds at night. Can also be used on freshwater lakes and ponds too.

   This new idea is not as much as some models out there.

   Parts List:
   ( 1 ) Attwood Marine Portable LED Navigation Light Kit - $30
           Attwood Marine Portable LED Navigation Light Kit
   ( 1 ) ¾" Inside Diameter PVC Drinking Water Pipe, cut to 50" length - $3.40
           1" dia. Drinking Water Pipe - cut to 50" length
   ( 1 ) Package of Reflective Safety Tape (2 Red /2 White) - $3.00 ea.
   ( 2 ) ½" long Arrow Fastener Aluminum Pop Rivets (50 pk.) - $6.00

   To install the pop rivets, you will need this tool:

   ( 1 ) Arrow Fastener Professional Rivet Tool
           Professional Rivet Tool

    This version is legal, and almost half the price of the Yak Attack version above.
    
   Let's begin:

   1.) For this project, you will need a 50" pipe with a ¾" inside diameter, and dress it up with Red & White Reflective Tape as shown below. 

   * * * NOTE: The purpose of adding the safety tape is simple. Some people can't see at night very well, so they opt to use a hand held spotlight to see where they're going. By having reflective tape on your kayak, lighted mast, and paddle, you'll stand out a lot better to avoid a collision.

   I bought a 2" x 6" pkg. of red / white reflective tape. I covered the top mast portion with one piece of 2" x 2½" red reflective tape first. Then, I used two 2" x 2½" pieces of White Reflective Tape, one on top of the other, to make a 4" wide section of White Reflective Tape. Then, I finished the bottom section with 2" x 2½" Red Reflective Tape. So, it looks like this:


   2.) I got this L.E.D. Navigational Light Kit from Wal-Mart for $30. 
It includes three 8" post sections that screw together, and some hardware.

We will need just the top post portion (the one with the grey clip at the end) for the white light.


   3.) Using the post with the plastic light attachment at the top, 
I'm going to drill two holes for the ( 2 ) rivets through the safety mast and the light post at the same time.

   To hold the inside post in place, I wedged a small flat head screwdriver down the inside pipe.


   4.) Using a 1/8" drill bit, drill two holes. Just drill the hole into the mast and the light post - but NOT all the way through.

   The first hole was drilled 1" from the top, then drill a second hole roughly 4" under the first hole.


   5.) Next, I used ( 2 ) pop rivets that were 1/8" in diameter, and about a 1/2" long.


   This is what it should look like so far.


   6.) Because this is a different size pipe, it won't fit properly in your # 241 Scotty mount. So, we are going to grind off a little bit at the bottom.

   This Scotty Mount is attached to the side of my gear crate: No. 241 Scotty Mount

   Using a grinding disc pad that I attached to my drill, grind off the last 2" from the bottom.


   7.) The finished product - without the flag. You may have to push and twist the mast into the # 241 Scotty Mount for a snug fit.


   The reason I chose this particular kit is because the CREE LED lamp lasts a lot longer and is a lot brighter than the other older incandescent lamp kits on the market.
   It also can be seen from over a mile away!


   * NOTE: Starting in 2016, the US Coast Guard & your local Conservation Enforcement Officers have been doing random "spot checks" on kayakers that fish at night. The first offense may get you a warning, but the second offense, may result in a steep fine. Do yourself a favor and make yourself a lighted mast with a orange (or, red) safety flag. The project costs less than $50 to make - considering YOUR life is worth a whole lot more!

Adding a Waterproof LED Light to your S.O.T. Hobie Kayak's Footwell

     While another season of dismal fishing ends, I begin to add new ideas to my already modified kayak. This DIY project is perfect for the kayak owner that owns a S.O.T. kayak, or more commonly referred to as a "Sit-On-Top" kayak. The hull is essentially hollow and will allow you to pack extra gear on the inside.

     While fishing at night, I thought it would a nice idea to add a waterproof light that lights up the foot well area of my Hobie Mirage Outback kayak - without blinding myself in the process. So, I started searching online for waterproof LED lights, and came across a site called Oznium.com. They sell waterproof LED lights that are perfectly suited for this application because they don't take up a whole lot of room. And the one lamp I added is powered by a (8 cell) "AA" battery pack that will last up to 2000+ hours. Here's how I did it.

     Parts List

( 1 ) 8 cell "AA" Battery Holder - Radio Shack Part # 270-407


( 1 ) LED Dot Switch, Black,16mm - Oznium Part # 1-1841-600 (I chose the color Blue)


( 1 ) Flush Mount LED Bolt, Black,16mm, Cool White LED, No Lens - Oznium Part # 1-2225-600


( 1 ) Pkg. of 5 Heavy Duty 9V Snap Connectors - Radio Shack Part # 270-0324


( 1 ) 5/8" Spade Drill Bit


( 1 ) Pkg. of 1/8" Heat Shrink Tubing (Red) - Harbor Freight Part # 73441
( 1 ) Pkg. of 10 14-16 Gauge Watertight Heat Shrink Butt Connectors (Blue)
( 1 ) Pkg. of 10 18-22 Gauge Watertight Heat Shrink Butt Connectors (Red) 


     * Because I own a 2009 Hobie kayak, you may have to find a suitable spot to place your light so that it doesn't interfere with your vision at night. This light is incredibly bright with its CREE bulb. So, don't mount it facing towards you! I mounted mine inside the forward pocket, just in front of the center hatch.


      This is where I plan to install my LED lamp. Notice how I line it up to the center screw on my hatch.


     Be sure to remove the storage box inside the hatch area before drilling. Using a 5/8" Spade Drill Bit, drill a hole in the middle of that surface directly under the center screw - about 3/4" down.


     Remove the nut on the Flush Mount LED Bolt and run the wires through the hole.


     Photo 1:  To make extra sure that this light was watertight fully on the kayak's hull, I used a small dab of waterproof Tub & Tile Caulk Sealant. I rolled it into a small strand of caulk.

     Photo 2: Wrap it around the head of the lamp under the flanged part.

     Photo 3: After tightening the nut down on the lamp, remove any excess caulk.


     I chose a spot under my thigh, but next to the upper right of my center hatch. The switch sits roughly about the height of 1/8". You do not have to use caulk for this item - it already comes with a small rubber O-ring gasket.


     Now for the fun part - wiring the whole thing!  I used watertight connectors and heat shrunk the connections for that "professional installation" look. While Oznium did not provide a diagram to follow along to do the installation, I've included one for you. Oznium's Lamp and Lighted Switch wiring is about 3 feet long (more than enough for what we're about to do here).

     * * I would like to point out that the lighted relay switch wiring that Oznium provided has 3 wires (Red, Black, and Brown). While the wiring diagram has only 2 wires pictured below (Red and Black), I've included some good close up pictures for you to follow along to, making this install project a snap.


     Pulling the wires out of the kayak's hull, you will notice that the lighted relay switch has a third wire (Brown). This is so when the switch is activated, the Brown wire provides power to the Lamp on the bezel.


     Take the Black wire from the Lamp, and the Black wire from the Lighted Relay Switch, and strip off about a half inch off on the Black wires. Then, twist the two Black wires together. Cut a 1" piece of red 1/8" heat shrink tubing and slide it onto the Black wiring down to the end. Then, take a Blue Wiring Connector, slip it over the area where you twisted the two Black wires together, and crimp once near the Black wiring twist.

     * * * Use the Blue Connector because of the thickness of the two Black wires twisted together. 

     Take the Black wire from the Heavy Duty 9V Connector, cut a 1" piece of Red Heat Shrink Tubing and slide it down to the end of the connector. Then, strip off a half inch of Black wire from the 9V Connector, twist the wire, and insert the end into the Blue Wiring Connector. Crimp the end, and also the middle. Slide the 2 pieces of Red Heat Shrink Tubing up into the Blue Wiring Connector, as far as they will go. Use a Heat Gun to thoroughly melt the connections so they're tight.

     Repeat the same process for the Red Wire on the Lighted Relay Switch, and the Red Wire on the 9V Heavy Duty Connector. Use the Red Connector because of the thinner gauge wires for the Red.


     Next, cut two 1" pieces of 1/8" red Heat Shrink Tubing, and slide one piece on the Brown wire (from the relay switch), and the other over the Red wire (from the lamp). Repeat the same process as before.

     Don't forget to heat shrink the wire connections with a heat gun to ensure good watertight connections. 

     Be careful not the melt the connections too much, or it'll burn! 


     This is what the whole setup looks like when it's connected to the 8 "AA" Battery Pack Holder. To better protect your "12v power supply" from moisture, place it in a dry bag (such as the one it's pictured on).


     And this is what it looks like when it's completed!


Sunday, December 2, 2012

And yet, Another "Firestorm" of Controversy

   On another site, that I frequent often, (YakAngler.com) because it seems I have started another firestorm of controversy over the use of "adding the red/green lights to a kayak" in the forum section.

   Just about every idea that I've added to the "Look What I Did" category has gotten a slew of negative comments. Not all of them were negative. There were some that gave positive comments, which I truly appreciate, I do. But to those that didn't, those guys need to leave the negative comments aside.  They claimed they weren't bashing my idea, but in actuality, they were. They were probably pissed because it took me about 2 days to come up with an idea of how to mount the bow lights to the kayak. Whereas, it would've taken them nearly a month!

   I am fully aware of what kind of lighting is needed for night time excursions on a kayak. But not everyone can afford the "popular" brand (Yak Attack) out there that's currently going for around $60-$70 for their lighted safety mast with flag. The older versions had a bigger flag that made it easier for other boaters to see you. Now, the newer version has what looks to be a blaze orange "sock" that they consider to be a flag.

   Anyways, it all started out with a way to make an affordable lighted safety mast for under $10 for use on small ponds and lakes that don't allow the use of gas powered motor boats on the water. That was it (or, so I thought). Of course, "Johnny Safety-for-All" had to be the first to leave a negative comment about what's considered to be the correct way to avoid accidents on the water. Clearly, the jerk didn't read the not-so-fine print where I stated, they can be used on bodies of water that don't allow the use of gas-powered boats. Let's be clear here, your chances of being run over by another kayaker on the water are slim, to none. I'm going to venture a guess here: I seriously doubt you will get injured, or maimed, by another kayaker on the water, seeing as how most kayaks don't have motors on them.

   In all fairness, I think it's because my profile doesn't show that I have 1000+ posts. It shows that I only have 30+ posts. So, everybody thinks I'm a rookie poster. But, here's the shocker, I've been boating since I was 12 yrs old. I'm 45 now, and have piloted the following boats/inflatables during my fishing outings: an old truck inner tube, a small Coleman 6 ft inflatable raft, a "Sears & Roebuck Co" 10 ft fiberglass Gamefisher row boat w/ a Mercury 7.5 hp outboard, a 16 ft "Sea Nymph" aluminum row boat w/ a 7.5 hp Mercury outboard, a 23 ft "Yellowfin" sportfishing boat with a 225 hpYamaha I/O, a 19 ft "Grady White" sportfishing boat with a 200 hp Suzuki I/O, and a 8 ft inflatable pontoon boat.

   Now, I have a Hobie Outback with the Mirage Drive system. A kayak that uses pedals to move through the water virtually hands-free without the use of a paddle - except when you need to go in reverse. That's about the only time I ever have to use the paddle, which spends most of its time strapped to the side of the kayak.

   After I got a ton of not-so-nice comments, I decided to look for a better way to be more visible on the water at night, but to do it for an affordable price - one that everybody can afford. I will eventually post those ideas on this blog, but that's for another time.

   Walking through Wal-Mart one day, I decided to take a walk down to the boating section to see what they offered for lighted masts. I saw the usual items that used the old incandescent lamps except for one that used the newer LED lamps and were powered by 3 "AAA" batteries in each unit - a Red/Green bow light and a White stern light. It was nicely priced at $30 for the kit. It also had a small boat pictured on the front of the package that couldn't have been no more than 8 ft long. The guy was sitting in the dark anchored with both the stern & bow lights on. I bought the kit and took it home to see what I could make out of it. I took pictures along the way while I was doing the project.

   When I finished the project, I posted the pictures on the forum site, and waited to see what kind of comments I would get. Of course, I got the usual "thumbs up" praise for creating an easy to do project for the DIYer that costs less than $35 to make. The breakdown: $30 for the kit, and $2.50 for a 40" piece of  ¾" inside diameter Drinking Water Pipe. Figure in the tax, and it comes out around $35 total.

   The best part was, that I mentioned that I don't like throwing out parts, that work perfectly fine, because I will find a way to incorporate the other part in a upcoming project. And yet, that one little bit of info, generated a firestorm of controversy as to whether it could be used on a kayak, or not. Everybody wants to be a know-it-all concerning safety at night, but this one little bit of info was like tossing a grenade into an outhouse. Talk about a poop storm!

   About 3 weeks ago, I did a second project by posting the second part to the "Adding a White Light to your Safety Mast" (first post), by adding "Adding a Red/Green Light to your Kayak" (second follow-up post), which ignited such a heated debate as to whether the bow light usage was legal on a kayak. One poster from Virgina had to be "Johnny Safety-for-All" and start off by saying, "...nice job, BUT....." and that's where the tirade began. It got so bad, that one of the site's administrators had to step in and call the guy out by noting, ".....that having the bow lights on a kayak is neither improper, nor illegal."

   Technically, there's no law, whether it be the state you live in, or federal law mandated by the US Coast Guard, that says you can't have the bow lights on a kayak. There aren't any height requirements either concerning how high the bow lights should be sitting on any vessel. Or, whether the said vessel in question, needs to be in motion.

   And, I think that's where the other kayak anglers are basing their concerns about the bow light usage being used on a kayak. Because, a large majority of us sit and fish in kayaks that are 15 ft or less in length, they feel as though they are "targets" out on the water because we sit so low to the water line. It's true that we technically don't need the bow lights on our kayaks, but I figured that since the kit came with the extra lamp, I thought I'd show everyone a way that would incorporate the lamp in a positive way on a kayak.

   Regardless of what the nay-sayers say, or think, I'm going to use them on my kayak anyway.

Here's what was said that sparked some explosive comments on YakAngler.com about my idea:

Forum member, landingcrew wrote:
"now why did i do all of this? its because if you get an enforcement officer either from local or federal side they may see you not within your prescribed rules and hit you with a ticket...and they are not cheap trust me the captain that has his boat next to the one i work on got hit for improper lights and it cost him a grip of money. best of luck to you but i am just trying to educate that is all. tight lines."

Site Administrator, YakSushi wrote:
I disagree with the above statement:

Reference: Title 33 CFR 83.25 Sailing vessels and vessels under oars.


83.25 - Sailing vessels underway and vessels under oars (Rule 25).

(a) Sailing vessels underway. A sailing vessel underway shall exhibit:

(1) Sidelights; and

(2) A stern light.
(2) A vessel under oars may exhibit the lights prescribed in this Rule for sailing vessels, but if she does not, she shall have ready at hand an electric torch or lighted lantern showing a white light which shall be exhibited in sufficient time to prevent collision.

The key phrase here is "A vessel under oars may exhibit the lights prescribed in this Rule for sailing vessels".

KayakFisher1967 is totally legal displaying the lights and if he were to get a ticket could easily dispute it as per the above Regulations.

Weather I agree with the lights or not it is by no means wrong of him to add them to his kayak and he can back this up with the above regulations.

It gets even better, with another heated follow-up post:

Forum member, landingcrew wrote:
"Recently I have noticed not only on yakangler but everywhere that people have come up with great ideas on how to be visible at night. for example; using blue, green, or red lights or a variation and/or flashing variation of them. Now these are all great ideas...BUT, they are all misleading and potentially could put others and yourself in danger. Let me explain;

I was told of a situation down in Louisiana of a kayaker that was out at night, he was using a blue light, he got into a situation; he hooked himself with a large hook and while trying to remove it lost his paddle. He tried to wave down passing vessels but they wouldn't stop. Now when he finally got close enough to yell at a vessel at anchor he got the help he needed. When asked why they didn't come to help him ealier, they noted that because he was waving his arm infront of the blue light they thought he was a law enforcement vessel. Why would they think that? Well, because blue is only to be used out on the water by law enforcement vessels!

Here is another; gentleman was out on his new boat, a motorized vessel, and was at anchor next to a narrow channel. A much larger vessel was moving down the very narrow channel at cruising speed as there was no wake restrictions. The gentlemen's vessel was very small, with a short freeboard, (think tracker bass boats) as the larger vessel passed, the large wake caused the smaller vessel to shift and subsequently sank due to the stern getting swamped, and sinking the vessel within a matter of seconds. After rescue the gentleman explained what happened to him, pride hurting obviously, he was asked what lights he was using while at anchor. He explained that he had an all around white light AND running lights on at the time. Now, the larger vessel's captain was found and questioned as well, he explained that he saw no vessels at anchor that night only one small vessel MAKING WAY. When he was told that that small vessel was at anchor and subsequently sank due to the wake his vessel had pushed out. the captain of the larger vessel stated that "If I would've known that the other vessel was at anchor I would've slowed to reduce my wake as a courtesy, I do it all of the time because people anchor so close to the channel, its not only common courtesy but for safety." No charges where brought up against the captain as the smaller vessel was using improper lights. The dual Red/Green lamps are for motorized machines.

Here are just a few examples of those that tried to become visible, and those that didn't know better and cost them pain of the flesh and pain in the wallet (i know if i sank my new boat i would be sleeping alone at night for the rest of my life).

 I am doing this to educate, so what does the coast guard say (i am going to break it down) what they told me this morning when i went to the coast guard station in Portsmouth, VA to clarify and to see what they would recommend, and of course, the Navigation petty officer had to do the spiel on what rule 25 states on vessels using oars as main propulsion, that they only need a directional white light shown in due time as to avoid a collision. now that's official, now here is whats cool, if you use a 360 white light, then theoretically you are using a directional light that just so happens to broadcast in all directions. if its left on then you are constantly showing in due time to avoid collision. now his thoughts on using running lights, he sees it as a danger, mainly because even the novice boater has some understanding that a white light means anchored vessel, and to slow down (even though we all know a-holes that don't care) but they will not slow down if they see the red and greens, there thinking (now this is for the newest/weekend boater) is that if they see those red and green lights that YOU have the ability to maneuver in ample time if there is an issue.

Okay, I have put a few terms that i will give the definitions for:

Underway - Any vessel that is not anchored, moored to a dock or land, or is aground.

Making way - Any vessel that is under power, such as: motor, sail or paddle.

Rules of Navigation - (rules of the road) otherwise known as COLREGS (International Regulations for Preventing Collisions at Sea), International Navigational Rules Act of 1977, and THE Inland Navigation Rules Act of 1980. these rules are used WORLD WIDE, some countries use the international rules for there inland but many use the same inland rules as the states. oh and every state must adhere to these rules, they can not, can't, will not, illegally can't, change these rules for any reason. PERIOD!  All the same laws no matter where you go in inland waters or international waters.

I hope this clears up any questions out there.  Tight lines and stay safe!

   The same Administrator wrote back with another corrective post to "landingcrew's" above post:

Site Administrator, YakSushi wrote:
"Thanks for the info but this still doesn't address your statement about him getting a ticketed for having improper lights.

Now, you might think I'm just being a PITA (pain in the ass) about this, but calling out someone on the forums to say he is wrong, when according to the law, he is not, is bad information. I'm only arguing the facts. Again, I never said I agree, or disagree, with using the lights. Only that him using them, is not against the law."

   I fired back my own comment, to Landingcrew, as well as any others hoping to leave more negative comments, by saying this:

Forum member, KayakFisher1967 wrote:
"CLEARLY, someone didn't quite read the not-so-fine-print, where I stated that, "If you want to use them, you can. If NOT, then that's fine too."

If the above said lights were "Improper" or "Illegal", then the lamps are either broken, burnt out, or faulty wiring is the culprit. Regardless of who makes them, they will always be Red (Left)/Green (Right). See below:


   http://www.attwoodmarine.com/store/category/lighting/navigation

The purpose of the Red/Green bow lights is to act as a stoplight when out on the water. It doesn't necessarily mean one HAS to be under power! If another boater wishes to pass in front of you from the right (green - starboard side), then I am to stand down and wait. After all, it's HIS red lamp that I'm seeing. If that said boater wishes to pass from the left (red - port side), then HE is to either stand down & wait, or I'm not moving, he may wish to pass by going behind me. Because it's MY red lamp that HE'S seeing.

As I stated in my post, you can either use it, or toss it. Here is CT, when boating at night on the ocean, if you want "run with the big boys", at least "dress like one". So says the USCG navigation manual for CT. In your state, it may be different. Though the coastal waters are federally mandated by the US Coast Guard, the USCG provides a manual for each state concerning its jurisdiction on the matter.

I will also state that a large percentage of boating accidents happen mainly during the day on the weekends. Any guy who spends his life savings on the boat of his dreams, will most likely avoid any run-ins with other boaters at all costs - regardless of size. And, since the majority of us are never far from shore (usually 1 mile or less), this really shouldn't be a problem. I've never personally heard of an marine patrol agent handing out a fat ticket for having the proper lighting on a kayak, canoe, or rowboat. But, I'd love to see it.

PS: I work in the Connecticut court system as a Judicial Marshal, so yeah, I do know what I'm talking about and have thoroughly done my homework."


   With that said, I gave the administrator a huge thank you, and mentioned that being a new poster on the site, I noticed that the comments were falling into the "cyber-bullying" category, but that I also stood my ground and finished by saying, "Regardless of what the nay-sayers say, or think, I'm going to use them on my kayak anyway."

   I will add, that I mostly troll the waters in search for Striped Bass, which would mean that I'm "Making way" (Any vessel that is under power, such as: motor, sail or paddle [kayak].), and by using the dual red/green lamp, I am absolutely correct in doing so, therefore I am, by all means, IN MOTION. End of discussion!