If you're new to my blog page, I'd like to introduce myself to you. My name's Jeff, and I fish out of a 12 foot Hobie Outback Mirage kayak. I've have made numerous upgrades to my kayak that makes it better than stock, but is tailor-made and outfitted to suit my tastes. I started out fishing freshwater alone on local lakes and small ponds that only allow electric trolling motors. But the problem with this was, the ponds and lakes I fished at were frequented by others as well, and often depleted the supply quickly. So, in 2011, I joined a saltwater club in neighboring Rhode Island and signed up with the kayak group in this club so I wouldn't have to fish alone.
I got to learn about all the great places to launch in RI, and 98% of them you don't have to pay a fee to park or get in. If you leave your home early enough, you can avoid a parking fee, as these other places usually start charging a fee to park after 8 am. I will admit though, there are still a lot of places that I still have not had the chance to see, or fish. Some of these places are known only to the locals and are not listed in the state rules & regulations guide for Rhode Island.
So, what does this have to do with "Blue Water Kayak Fishing" & the "DC Flip"? Well, for the past 2 years, the club has been talking about doing "kayak self rescue & re-entry" class, but the problem was, finding an instructor that was skilled in the art of re-entry into an overturned sit-on-top fishing kayak, and finding a suitable place to engage in this type of activity. Most of the videos on YouTube show a re-entry done on an unloaded kayak in a swimming pool, small pond, or a private lake.
A few members suggested that it be done in "real world conditions" in the surf, where the reality needs to set in, that this type of kayak fishing, done in saltwater, needs to be classified as "extreme". And, as with most extreme sports, there is the reality of a potentially high risk of danger involved that will be addressed in this article. Others, had made suggestions about using our own kayaks, but said they should be "unloaded", so they can go through the motions one-on-one with whoever is doing the instructing. One member suggested that we have EMS & a Marine Patrol Unit on standby should something go wrong.
On a recent incident, on Saturday September 17, 2016 at Rocky Point Park in Warwick,RI, I led an outing here because in the past, the conditions here have been nearly perfect on past excursions when I'm with friends. But this last outing was different. The forecast called for winds at 7 mph from south, and picking up to 13 mph from the south in the afternoon with high temperature of 89 degrees, and water temps at 87 degrees.
When we arrived at the park entrance, which is heavily protected by many trees, it seemed like a good day. As the other members started to show up, my friend Mona went to greet some of the others who had shown up before we got there, and she & Kraig took a short walk down to the shoreline to check out the sea conditions. Kraig & Mona came back to report that the winds were coming in from the south and the seas looked to be a bit choppy, or as we like to refer to them as "whitecaps".
Once we got all the kayaks rigged and loaded, we made our way down to the shoreline, via paved roadway (the other half of Rocky Point Avenue which is gated off at the entrance). When we got down to the shore, the wind seemed a lot more than the 13 mph the weatherman had predicted earlier that morning, almost blustery in a sense. I probably should have exercised better caution and called off this day's launch. But, we're New Englanders, and we are somewhat suicidal when it comes to fishing the extremes, so we lined up for our photo op - all 3 of us (Kraig, Greg , and myself. Steve would've been the 4th, but he had already headed out). Greg noted that he felt like the newest member of the "Suicide Squad" heading out into conditions like this, as it was choppier than we expected.
Everyone went their separate ways. I headed out north towards the old pier, and the small reef. Steve was already circling the area near the pier. Kraig headed southeast towards the islands. And Greg went south hugging the shoreline and eventually anchored near a large reef area. The shoreline area holds a lot of fish like bluefish, porgy/scup, striped bass, black sea bass, and maybe even a kingfish.
Steve headed in early, as he had other obligations to attend to. He mentioned earlier that he would only be out on the water for an hour and a half. At around the same time Steve headed in, I thought I had a bite, but ended getting my Kastmaster lure hung up on a rock in about 20 feet of water. After several unsuccessful attempts of trying to free the stuck lure, I abandoned all hope of getting it back, and eventually cut the line with my dive knife (a small knife in a sheath that is attached by a lanyard around my neck). After about a half hour of fighting the incoming tide, and the strong winds from the south, I decided to make my way in. I will mention here that that winds felt stronger coming back because for every wave I rode over, the second wave came up over the bow of the kayak's nose and got me more wet than I had anticipated for that day. I finally made it back to the beach where I wanted to exit at.
I will note here, that this area of the beach has a cement ramp that leads right to the water's edge allowing you to put in, or exit with ease. It has been a fixture at the location since the early 1900s, which by the way, was once a beautiful amusement park in its day. RIP: Rocky Point 1847-1995.
Anyway, I lined my kayak up with the beach ramp, and proceeded to my make turn towards the ramp. As I did this, my timing between the waves, the combination of the wind and strong tidal current, as well as, not turning the rudder sharper and paddling faster, caused my kayak to lean heavily on its right side. I tried to counter correct this by leaning to the left to try and balance it out. At this point, I knew the inevitable was coming - that point in time when you KNOW you're about to rollover (aka do the DC Flip*).
* The "DC Flip", is named after kayak fishing member Dennis Carusoe (DC) after his kayak rolled off the southeast coast of Block Island,RI one afternoon in 2013. He stated that he was hit by a rogue wave and described it as, "....having your chair yanked out from underneath you". The wave caught him off guard, and within a half a second, he found himself upside down in the water, struggling to get his kayak righted up, and back in his kayak - an ordeal he later described as, "it took forever to get back in!" (roughly an hour, with the help of kayak fishing member Robert Oberg) .
The last thing I remember doing, and it was a true "guy thing", because that moment when you know you can't save the kayak from going over, you put your opposite hand down to try and "break the fall", and of course, not realizing that you're on the water - it didn't do any good. WHOOSH! I was in the water before I realized it had even happened!
I remember hitting the water on my right side, in theory, I was supposed to exit outside of the kayak's right side. Instead, I wound up underneath the kayak - after I expelled half my lung's capacity for air after saying, "AW CRAP!!!!". After what seemed like 2 seconds of panic, I needed to get the kayak off of my head. The force of my life vest was working against me as I tried to push the kayak up, but found myself pushing my whole body deeper under water. The life vest was doing its job of keeping me afloat, but I was running out of time, and more importantly, out of air while being trapped under the kayak! So, I pushed myself down under water, and felt for the edge of the kayak, then pushed the kayak's edge away from me. As I did that, my body floated back up to the surface, and my head was above the surface so I could breathe again.
Once I was back out from under the kayak, I needed to get my bearings on which side of the kayak had the rescue rope attached to it. My rescue rope is made out of 550 paracord, but it's double up giving me at least 1100 lb of strength. I had it attached on my kayak's left handle. I ended up on my kayak's right side when I flipped. So, I began to float over to the left side. Once I got there, I had to undo 1 clip on the side, then throw it over the hull, and float back over to the other side again.
The idea of the rescue rope was to be used as an aid in helping you turn the kayak over by tugging on the rope. This was my first time using such a rope. Because it was a "prototype", I had it made to 60" in length. It did not work the way I intended it to. Instead of flipping the kayak over, I ended up climbing on top of the hull. When it didn't flip like I intended it to, I decided to "help" it flip over. I grabbed the rope closest to the hull, while holding the clip end firmly, and leaned backward into the water. When I did this, it righted the kayak back over in a hurry. Next, I had to re-attach the clip onto the handle and store the rope away onto one of the storage trays next to the seat.
Getting back in using the rescue rope as stirrup didn't work out the way I had planned because the stirrup was too short. It was 30" in length - not long enough for me to get my foot on the loop. So, I had to go with another option.
I had to level my body flat in the water, like a Superman pose. I put my left hand on the left side of the kayak for balance. With my right hand, I grabbed the right side handle on the other side. While kicking with my feet, I pulled my body across the top of the kayak, and within a few seconds, I was back in the seat of my kayak in no time!
Once I was back in the seat, I began picking up my fishing poles, which were tethered to the rod holsters by a leash. Then, I went about circling the area for my hat, my bait cup, my paddle, and 2 jugs of saltwater (for a demo project). All my gear in my gear crate was safe - thanks to the latch system I made. My ordeal cost me my 3 lb anchor (unsecured), my small dive knife (it must have come unsheathed while climbing back in), and a small bag of bait (I hope the fish are happy they got a free meal).
All of this happened so fast, that my friends couldn't believe I performed a near perfect "self rescue kayak re-entry" in under 5 minutes flat. In fact, Greg thought that because there no action in the water, that he thought I'd try my hand at a self rescue re-entry attempt - just to break the boredom. Now, everybody emailed the incident on our private email board about what happened that day. And, now they've asked me if I'd be interested in doing a clinic in the future about righting a kayak and performing a self rescue re-entry. I said,"yes".
There are some other things that I didn't mention earlier. About 2-3 days after this incident occurred, I began to notice several bruises appearing in places that I normally don't get bruises. While the re-entry was a success, it didn't come without it's injuries. Some issues that arose during the rollover:
1.) While trying to undo the clip for the rescue rope, the force of the waves hitting the kayak on the other side were making the kayak pound against my head, leaving a noticeable welt on my forehead.
2.) I noticed several bruises, scratches, and a small cut on my left forearm that had started to bleed.
3.) The urgency to get back in the kayak was at the top of my list. The only other option was getting slammed against the reefs by an upside down, 110 lb kayak.
4.) Sharks can smell blood underwater from up to 2 miles away. The small cut on my left arm gave me the incentive to hurry and get back in the kayak.
5.) Though there were other kayak fishing members nearby, I also had my floating marine radio, and a safety whistle that could be used to attract attention.
6.) YouTube has a ton of videos on how to do a "Sit-On-Top kayak self rescue attempt". Study each video carefully. I watched them over & over - like a hundred times.
7.) Don't panic! Stay calm, and remember what you watched on YouTube about the self rescue attempt. It will all come together naturally like clockwork.
So, now begins the hard part on the location on where to do this clinic for the "SOT Self Rescue Kayak Re-Entry". But, that's a subject that we will bring up at our year end dinner meeting in November.
As usual, keep those lines wet & tight! - J.
Tuesday, September 27, 2016
Saturday, July 9, 2016
Kayak Fishing Safety - What to carry while on the water.
One of the first things that somebody asks me when I do some seminars for the big Northeast Saltwater Show is: "What safety precautions should I take before hitting the water?" To most boaters, we are kind of like "speed bumps" out on the water, so I'll give you some tips on how to be more visible on the water - day, or night.
1.) Life Vest
First, and foremost, make sure you have a quality life vest. I wear a life vest made by Stohlquist, which I paid around $135. I've had it since 2010, and is a bright yellow. The Stohlquist life vest is made for kayak anglers. I have the freedom to move my arms in any direction, and there are plenty of straps to adjust the fit of any person. It also has reflective striping on the front & the back of the vest, along with two large pockets on either side of the zipper.
There are several kinds on the market (Stohlquist, Coleman, Ascend, etc.), so be prepared to pay between $80 - $150). Check out sites like Bass Pro Shops (BassPro.com), Cabela's (Cabelas.com) and Austin Canoe & Kayak (AustinKayak.com)
Be sure to try on different life vests when choosing a vest that suits your seat style so that it's compatible with your seat's back cushion.
My life vest has a small flotation cushion that sits on the back of my shoulders. The bottom of the cushion is perfectly aligned with the top of my seat's back rest. Something to keep in mind.

Photo 1.) The author shown with his Stohlquist life vest, Standard Horizon Marine Radio, Safety Whistle (attached to the zipper on his life vest), and homemade safety mast & flag while fishing at Rocky Point Park in Warwick, RI in August 2015.
I don't believe in those "inflatable" life preservers. Though the inflatable vest maybe somewhat cheaper, the floating cushion is more durable than its "airy" relatives. Here are some key things to consider when choosing the right vest:
* The air chamber on an inflatable vest could become dry rotted over time, causing the vest to explode, or it may develop a pinhole leak when you least expect it.
* The small CO2 cartridge may have a slow leak and may not deploy upon hitting the water, or at all, when pulling on the emergency cord.
There are 2 types of inflatable life preservers on the market today:
A.) Auto-Inflate - The air chamber inflates as soon as you come in contact with the water via small CO2 cartridge. *Note: Don't forget to change out the CO2 cartridge if it was used that day. Always carry spare CO2 cartridges.
B.) Self-Inflate - Same as above, except you pull on a small red (or, yellow) cord, and your vest inflates in a matter of seconds.
2.) Marine Radio (Floating)
Depending on where you're fishing, always carry a Marine Radio with you at all times. Even if you're not fishing saltwater. Most marine radios will float, has an emergency number (channel 16) that's monitored by the US Coast Guard, a small clip on the back of the radio to clip onto your vest, and has at least 10 WX (weather) channels. Nobody likes having "mother nature" turn ugly, so it's best to stay on top of things on a moments notice. I fish mostly saltwater these days, so the marine radio, made by Standard Horizon, comes in handy in letting me know when it's high tide/low tide, swell level info, wind speed, and other info that could decide whether or not you have a good day of fishing, or a lousy day of fishing. It's also a great way to maintain communication between you & your fishing buddies should something go awry.
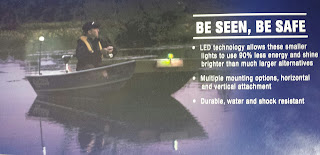
3.) Lighted Mast with Safety Flag
"Why a safety flag???" And, "what's with the light???" "Do I really need these???" In response to these questions, the answer is "Yes!"
The main purpose of the flag is to provide greater visibility on the open water - especially during deep swells. When you, and your kayak, drop to the deepest part of the swell, you literally become "invisible" to other oncoming boaters, which could result in a head-on collision, or worse, a fatality on the water.
The white light is instrumental when you're using your kayak in heavy fog, or fishing at night to avoid being hit by other boaters.
On 12/15/2012, I wrote 2 articles on "How to make a lighted mast", and "How to add a orange safety flag". Clicking on these 2 topics will open up new windows to the previously written blogs.
* Note: The light kit I used in my lighted mast blog is made by Attwood Marine - a leader in the field of marine accessories boat both large & small boats. I chose the LED light kit because the light produces the brightest and whitest light possible that's visible up to 2 miles away.
* * Note: While the flag I used came from Cabela's, it's not listed in their catalog. You can try Home Depot. They sell one 18" x 18" flag that costs around $5.00. I would trim the flag down to 12" H x 18" L
4.) Safety Whistle (aka "Sound Producing Device")
The US Coast Guard's Navigation Rules state you must have some type of sound producing device at the ready to avoid a collision on the water. While the US Coast Guard seldom does these types of inspections, your state's Game Wardens, or Conservation Enforcement officers, will sometimes do a random check at the local boat launch parking area to see if you have the necessary equipment on your person.
I chose a pea-less safety whistle as my sound producing device. To have it "at the ready", as instructed, I chose to attach it to my life vest's zipper (as shown in the pic above), because it's there when I need it. I got mine at Cabela's in a 2-pack for $6.00.
5.) Navigation Lights (Red/Green Light and 360º White Light)
This is one topic that is always a concern for those of us who fish in a kayak. At the New England Saltwater Show 2016 at the Providence Convention Center in Providence,RI, my kayak was featured in our "Kayak Committee" show booth. Early Saturday morning, the Coast Guard Auxiliary men and women, as well as the Rhode Island Conservation Enforcement Officers, decided to stop by and check out the "kayak with the nav lights" on display. Apparently, a "overly concerned" patron at the show, alerted the USCG staff that my kayak was "illegally" displaying navigation lights that are "meant for motorized vessels". After a thorough inspection of the navigation lights in question, all the USCG members present agreed, that I DID NOT violate any rules of the road, since my Hobie Outback kayak is Pedal Driven, I am ALWAYS "under power" when I stated that I mostly troll - meaning that I am in constant motion - without the use of a motor!
A lot of people are installing the navigation lights because more kayak manufacturers are making kayaks with electric motors already in them, and the kayaks without motors, are being converted to a electric trolling motor assistance.
So, what does this mean for you? Well, the USCG rules state that all you need at night is "a White Light that's visible 360º in all directions."
From my point of view, you will need to get that white light up pretty high. High enough to clear the top of your head. If any part of your body is in the way forward of the light, you run the risk of blocking the white light's functional duties of doing its job, and keeping you safe at night from other boaters.
YakAttack makes a lighted safety mast for around $85-$90, but in my blog above, I show you how to make a better (and brighter) lighted safety mast for roughly around $45.
Taken from the USCG's "Rules of the Road - A Boater's Guide to the Federal Requirements for Recreational Boats"
Vessel Under Oars - A vessel under oars may exhibit the lights for a sailboat . If it does not, it shall have ready at hand an electric torch (flashlight) or lighted lantern showing a white light that shall be exhibited in sufficient time to prevent collision .
Anchored Vessels At night: All vessels at anchor must display anchor lights . If your vessel is less than 164 feet (50 meters) in length, then its anchor light is an all-round (360º) white light visible where it can best be seen from all directions.
Reminder: If you are operating your sailing vessel or kayak at night using machinery, or sail and machinery, then your vessel or kayak must display the lights required for a power-driven vessel.
* Note that a sail vessel or kayak under machine propulsion is considered a power-driven vessel.
Power-Driven Vessels - If your power-driven vessel is less than 39 .4 feet (12 meters) in length, then it may display navigation lights.
6.) What to wear (as far as clothing goes)
I like to wear bright clothing. In the early Spring, I have a blaze orange hoodie that I wear over an Under Armor base layer system. For pants, I wear my hip waders, or sometimes, I'll wear my Frogg Toggs rain suit bottoms. They're water repellent, and windproof as well.
* If your budget isn't a problem, then a dry suit maybe for you. but be warned as the dry suits aren't cheap. Be prepared to shell out $900- $1200 for a good quality dry suit.
In the Summer, I love wearing the long sleeved fishing shirts. I have many colors. Most are rated at 50 SPF which is nice for those of us that can't apply sunblock on our own backs. Sometimes, I'll wear a neck gaiter made by Buff Wear, and pull it up to cover my face from sunburn.
For pants, I wear expedition pants from Eastern Mountain Sports. They're lightweight, dry extremely quick, and zip off part of the pants at the thighs that turn them into shorts pretty quickly.
I wear glasses, so I wear Wiley-X sunglasses with bifocals, anti-glare, shatterproof lenses, and most of all - polarized to cut down on the glare from the water.
I like to wear a wide brimmed fedora-style Aussie hat with a mesh top that allows the sea breeze to cool off my head.
I also wear a good quality pair of neoprene ankle boots with zip up sides from LL Bean to keep the sunburn at bay, and the sand out of my shoes.
Not shown - I wear Buff Wear kayak gloves, also rated at 50 SPF. They are padded and reinforced around the palm and finger areas for durability. I like the fact that my fingertips are exposed, making it easy to pick up small items.
7.) Self Rescue Kayak Ladder
Though we often take our "sit-on-top" kayaks for granted at how stable they are on the water, we often overlook the possibility of tipping over, or worse, on saltwater being "caught off guard" by a potential rogue wave.
Have you ever thought about how you're going to get back into your "SOT" kayak after such an event happens? Some of us practice getting back into our kayaks on a small pond or lake, but most of us don't.
Fortunately, for you, there are a few solutions to remedy this problem:
* Please keep in mind that these 2 ideas are meant for "Sit-On-Top" kayaks only.
First, you can make your own side stirrup, or have one custom made using paracord. Paracord is extremely strong, durable, and comes in a variety of colors to match your kayak. If you're not handy enough to make your own, my kayak angler friend Mona Rodriguez (of Mo's Designs) can make you a custom paracord stirrup. She's also very good at making custom made paracord rod leashes too. Most orders will take about a day to complete. She can be reached via email here: SmidgensPride@yahoo.com
Second, you can buy an already made one online. Although, they are a bit more expensive than the previous version, you can see in action here at: http://www.kayakselfrescueladder.com/ . There is a short video on the page that gives you a demo on how it works, and how it's used. For purchase info, go here: http://shop.kayakselfrescueladder.com/
8.) Rod Leashes
Imagine the scenario where you're out on the water, your rod is laid out across the top of the hull, and you turn around to reach for some bait, then you turn back and find your rod missing! If you've never had that happen, then consider yourself very fortunate. It's only a matter of time......
Here's a scenario I witnessed while fishing off Block Island,RI in 2012. A small group us were highly experienced kayak anglers were fishing off the island's southeast corner in an area known for heavy Striped Bass activity, but also known for its deep swells from shifting tidal currents. Dennis Carusoe decides to head out farther from the group, approximately a mile offshore, to chase some fluke. At some point around noontime, he opened up his center hatch to reach for a sandwich. When, all of a sudden, a huge swell came up from behind him, (a feeling he later described as "having a chair yanked out from underneath you") followed by a second swell that eventually flipped him and his gear overboard. One minute his safety flag was visible, the next time, it wasn't.
Bob Oberg, who was nearby, saw that Dennis was having difficulty in righting his kayak, as well as getting back in, lost most of his gear - three $500 rod/reels and several hundred dollars worth of gear from his gear basket.
My case in point? Secure everything with a leash if you don't want to lose it. You attach your leash to your reel base (the part that's attached to the rod), and the other end can be clamped to a pad eye - you can purchase those here: Nylon Pad Eye .
9.) Gear Basket
This is my all-in-one lure holder. It carries everything I need - all in one place. I also have an additional 3-rod holder mounted on the back. I made a holster out of 2" pvc pipe for my Lip Grippers (a very useful tool to use while removing hooks from our toothy friends). I also have a Scotty Mount attached on the front/side of the crate. This is where I mount my lighted safety mast. In the last photo, I added an additional "mini" storage crate made from two other milk crates. To keep the cover, and the smaller storage crate sealed tightly, I added two small plastic kitchen knobs and some mini bungee cords. Everything attached to the crate is held in place with automotive zip ties (white).
To make your own custom gear basket, if you have the room to do so, you can go to my previous blog here: Adding a Custom Gear Basket to your Kayak
You can see it here:


10.) Personal Kayak Cart
Depending on the region where you live, at some point you will get tired of dragging your kayak across the dirt/gravel/sand, and will have to break down and get a personal cart for your kayak. This will save you wear & tear on your kayak's underside, as well as, save your back and your legs in the long run. While there are numerous ways to make a kayak cart out of pvc pipe, there are also several ways to attach the said cart to your kayak. I will admit that I've tried making one out of pvc piping with failed results. There are two very good approaches to this dilemma.
If you have a sit-inside kayak, with NO scupper drain holes, then this maybe the ticket for you:
http://www.basspro.com/Ascend-Canoe/Kayak-Cart/product/12092409343771/
For those of us that have a sit-on-top kayak, a cart that plugs into your kayak's scupper drain holes, this maybe the *solution for you:
http://www.basspro.com/Ascend-Sit-On-Top-Kayak-Cart/product/12092409343777/
* Note: Some people left negative reviews on this cart option due to the fact the top & bottom bars have locking clamps, but also have two small locking buttons that must be pressed in at the same time in order to shorten the width of the axle to avoid them locking in place at the factory-set width. Once you have set up the axle width you want, then press the locking clamps down to hold it in place.
I live on the east coast, near Rhode Island, so I frequently launch in some pretty sandy spots. My kayak of choice is a 2009 Hobie Outback Mirage. When it's fully rigged up, it weighs around 120 pounds. My standard kayak cart broke a weld at the bottom, so I spent the extra money ($365), and got myself a wider kayak cart with Wheeleez beach wheels. They are overly wide at 12" and 10" tall, but they make dragging my kayak across deep sand a breeze. They also make it easier to transport over uneven terrain.
So, that's what I carry, and wear, when I'm out on the water. I like wearing the full coverage clothing in the summer to prevent sunburn, and to prevent that burning sensation you get from applying sunblock to sensitive areas (ankles, toes, nose, face, ears, etc.) that cause your eyes to tear up and burn for hours.
You can get away with making most of the items on this list yourself. Others will require you to get the real thing. Either way, you will have fun doing the little projects because it's something you took pride in doing yourself. Who knows? Maybe your friends will want you to make one for them as well!
I hope this helps you in the future, if you decide try fishing at night, bring a friend, and make sure your have a dry bag for your cell phone. Your GPS isn't just for the road!
As usual, keep those lines wet & tight!
1.) Life Vest
First, and foremost, make sure you have a quality life vest. I wear a life vest made by Stohlquist, which I paid around $135. I've had it since 2010, and is a bright yellow. The Stohlquist life vest is made for kayak anglers. I have the freedom to move my arms in any direction, and there are plenty of straps to adjust the fit of any person. It also has reflective striping on the front & the back of the vest, along with two large pockets on either side of the zipper.
There are several kinds on the market (Stohlquist, Coleman, Ascend, etc.), so be prepared to pay between $80 - $150). Check out sites like Bass Pro Shops (BassPro.com), Cabela's (Cabelas.com) and Austin Canoe & Kayak (AustinKayak.com)
Be sure to try on different life vests when choosing a vest that suits your seat style so that it's compatible with your seat's back cushion.
My life vest has a small flotation cushion that sits on the back of my shoulders. The bottom of the cushion is perfectly aligned with the top of my seat's back rest. Something to keep in mind.

I don't believe in those "inflatable" life preservers. Though the inflatable vest maybe somewhat cheaper, the floating cushion is more durable than its "airy" relatives. Here are some key things to consider when choosing the right vest:
* The air chamber on an inflatable vest could become dry rotted over time, causing the vest to explode, or it may develop a pinhole leak when you least expect it.
* The small CO2 cartridge may have a slow leak and may not deploy upon hitting the water, or at all, when pulling on the emergency cord.
There are 2 types of inflatable life preservers on the market today:
A.) Auto-Inflate - The air chamber inflates as soon as you come in contact with the water via small CO2 cartridge. *Note: Don't forget to change out the CO2 cartridge if it was used that day. Always carry spare CO2 cartridges.
B.) Self-Inflate - Same as above, except you pull on a small red (or, yellow) cord, and your vest inflates in a matter of seconds.
2.) Marine Radio (Floating)
Depending on where you're fishing, always carry a Marine Radio with you at all times. Even if you're not fishing saltwater. Most marine radios will float, has an emergency number (channel 16) that's monitored by the US Coast Guard, a small clip on the back of the radio to clip onto your vest, and has at least 10 WX (weather) channels. Nobody likes having "mother nature" turn ugly, so it's best to stay on top of things on a moments notice. I fish mostly saltwater these days, so the marine radio, made by Standard Horizon, comes in handy in letting me know when it's high tide/low tide, swell level info, wind speed, and other info that could decide whether or not you have a good day of fishing, or a lousy day of fishing. It's also a great way to maintain communication between you & your fishing buddies should something go awry.
3.) Lighted Mast with Safety Flag
"Why a safety flag???" And, "what's with the light???" "Do I really need these???" In response to these questions, the answer is "Yes!"
The main purpose of the flag is to provide greater visibility on the open water - especially during deep swells. When you, and your kayak, drop to the deepest part of the swell, you literally become "invisible" to other oncoming boaters, which could result in a head-on collision, or worse, a fatality on the water.
The white light is instrumental when you're using your kayak in heavy fog, or fishing at night to avoid being hit by other boaters.
On 12/15/2012, I wrote 2 articles on "How to make a lighted mast", and "How to add a orange safety flag". Clicking on these 2 topics will open up new windows to the previously written blogs.
* Note: The light kit I used in my lighted mast blog is made by Attwood Marine - a leader in the field of marine accessories boat both large & small boats. I chose the LED light kit because the light produces the brightest and whitest light possible that's visible up to 2 miles away.
* * Note: While the flag I used came from Cabela's, it's not listed in their catalog. You can try Home Depot. They sell one 18" x 18" flag that costs around $5.00. I would trim the flag down to 12" H x 18" L
4.) Safety Whistle (aka "Sound Producing Device")
The US Coast Guard's Navigation Rules state you must have some type of sound producing device at the ready to avoid a collision on the water. While the US Coast Guard seldom does these types of inspections, your state's Game Wardens, or Conservation Enforcement officers, will sometimes do a random check at the local boat launch parking area to see if you have the necessary equipment on your person.
I chose a pea-less safety whistle as my sound producing device. To have it "at the ready", as instructed, I chose to attach it to my life vest's zipper (as shown in the pic above), because it's there when I need it. I got mine at Cabela's in a 2-pack for $6.00.
5.) Navigation Lights (Red/Green Light and 360º White Light)
This is one topic that is always a concern for those of us who fish in a kayak. At the New England Saltwater Show 2016 at the Providence Convention Center in Providence,RI, my kayak was featured in our "Kayak Committee" show booth. Early Saturday morning, the Coast Guard Auxiliary men and women, as well as the Rhode Island Conservation Enforcement Officers, decided to stop by and check out the "kayak with the nav lights" on display. Apparently, a "overly concerned" patron at the show, alerted the USCG staff that my kayak was "illegally" displaying navigation lights that are "meant for motorized vessels". After a thorough inspection of the navigation lights in question, all the USCG members present agreed, that I DID NOT violate any rules of the road, since my Hobie Outback kayak is Pedal Driven, I am ALWAYS "under power" when I stated that I mostly troll - meaning that I am in constant motion - without the use of a motor!
A lot of people are installing the navigation lights because more kayak manufacturers are making kayaks with electric motors already in them, and the kayaks without motors, are being converted to a electric trolling motor assistance.
So, what does this mean for you? Well, the USCG rules state that all you need at night is "a White Light that's visible 360º in all directions."
From my point of view, you will need to get that white light up pretty high. High enough to clear the top of your head. If any part of your body is in the way forward of the light, you run the risk of blocking the white light's functional duties of doing its job, and keeping you safe at night from other boaters.
YakAttack makes a lighted safety mast for around $85-$90, but in my blog above, I show you how to make a better (and brighter) lighted safety mast for roughly around $45.

Taken from the USCG's "Rules of the Road - A Boater's Guide to the Federal Requirements for Recreational Boats"
Vessel Under Oars - A vessel under oars may exhibit the lights for a sailboat . If it does not, it shall have ready at hand an electric torch (flashlight) or lighted lantern showing a white light that shall be exhibited in sufficient time to prevent collision .
Anchored Vessels At night: All vessels at anchor must display anchor lights . If your vessel is less than 164 feet (50 meters) in length, then its anchor light is an all-round (360º) white light visible where it can best be seen from all directions.
Reminder: If you are operating your sailing vessel or kayak at night using machinery, or sail and machinery, then your vessel or kayak must display the lights required for a power-driven vessel.
* Note that a sail vessel or kayak under machine propulsion is considered a power-driven vessel.
Power-Driven Vessels - If your power-driven vessel is less than 39 .4 feet (12 meters) in length, then it may display navigation lights.
6.) What to wear (as far as clothing goes)
I like to wear bright clothing. In the early Spring, I have a blaze orange hoodie that I wear over an Under Armor base layer system. For pants, I wear my hip waders, or sometimes, I'll wear my Frogg Toggs rain suit bottoms. They're water repellent, and windproof as well.
* If your budget isn't a problem, then a dry suit maybe for you. but be warned as the dry suits aren't cheap. Be prepared to shell out $900- $1200 for a good quality dry suit.
In the Summer, I love wearing the long sleeved fishing shirts. I have many colors. Most are rated at 50 SPF which is nice for those of us that can't apply sunblock on our own backs. Sometimes, I'll wear a neck gaiter made by Buff Wear, and pull it up to cover my face from sunburn.
For pants, I wear expedition pants from Eastern Mountain Sports. They're lightweight, dry extremely quick, and zip off part of the pants at the thighs that turn them into shorts pretty quickly.
I wear glasses, so I wear Wiley-X sunglasses with bifocals, anti-glare, shatterproof lenses, and most of all - polarized to cut down on the glare from the water.
I like to wear a wide brimmed fedora-style Aussie hat with a mesh top that allows the sea breeze to cool off my head.
I also wear a good quality pair of neoprene ankle boots with zip up sides from LL Bean to keep the sunburn at bay, and the sand out of my shoes.
Not shown - I wear Buff Wear kayak gloves, also rated at 50 SPF. They are padded and reinforced around the palm and finger areas for durability. I like the fact that my fingertips are exposed, making it easy to pick up small items.
7.) Self Rescue Kayak Ladder
Though we often take our "sit-on-top" kayaks for granted at how stable they are on the water, we often overlook the possibility of tipping over, or worse, on saltwater being "caught off guard" by a potential rogue wave.
Have you ever thought about how you're going to get back into your "SOT" kayak after such an event happens? Some of us practice getting back into our kayaks on a small pond or lake, but most of us don't.
Fortunately, for you, there are a few solutions to remedy this problem:
* Please keep in mind that these 2 ideas are meant for "Sit-On-Top" kayaks only.
First, you can make your own side stirrup, or have one custom made using paracord. Paracord is extremely strong, durable, and comes in a variety of colors to match your kayak. If you're not handy enough to make your own, my kayak angler friend Mona Rodriguez (of Mo's Designs) can make you a custom paracord stirrup. She's also very good at making custom made paracord rod leashes too. Most orders will take about a day to complete. She can be reached via email here: SmidgensPride@yahoo.com
Second, you can buy an already made one online. Although, they are a bit more expensive than the previous version, you can see in action here at: http://www.kayakselfrescueladder.com/ . There is a short video on the page that gives you a demo on how it works, and how it's used. For purchase info, go here: http://shop.kayakselfrescueladder.com/
8.) Rod Leashes
Imagine the scenario where you're out on the water, your rod is laid out across the top of the hull, and you turn around to reach for some bait, then you turn back and find your rod missing! If you've never had that happen, then consider yourself very fortunate. It's only a matter of time......
Here's a scenario I witnessed while fishing off Block Island,RI in 2012. A small group us were highly experienced kayak anglers were fishing off the island's southeast corner in an area known for heavy Striped Bass activity, but also known for its deep swells from shifting tidal currents. Dennis Carusoe decides to head out farther from the group, approximately a mile offshore, to chase some fluke. At some point around noontime, he opened up his center hatch to reach for a sandwich. When, all of a sudden, a huge swell came up from behind him, (a feeling he later described as "having a chair yanked out from underneath you") followed by a second swell that eventually flipped him and his gear overboard. One minute his safety flag was visible, the next time, it wasn't.
Bob Oberg, who was nearby, saw that Dennis was having difficulty in righting his kayak, as well as getting back in, lost most of his gear - three $500 rod/reels and several hundred dollars worth of gear from his gear basket.
My case in point? Secure everything with a leash if you don't want to lose it. You attach your leash to your reel base (the part that's attached to the rod), and the other end can be clamped to a pad eye - you can purchase those here: Nylon Pad Eye .
9.) Gear Basket
This is my all-in-one lure holder. It carries everything I need - all in one place. I also have an additional 3-rod holder mounted on the back. I made a holster out of 2" pvc pipe for my Lip Grippers (a very useful tool to use while removing hooks from our toothy friends). I also have a Scotty Mount attached on the front/side of the crate. This is where I mount my lighted safety mast. In the last photo, I added an additional "mini" storage crate made from two other milk crates. To keep the cover, and the smaller storage crate sealed tightly, I added two small plastic kitchen knobs and some mini bungee cords. Everything attached to the crate is held in place with automotive zip ties (white).
To make your own custom gear basket, if you have the room to do so, you can go to my previous blog here: Adding a Custom Gear Basket to your Kayak
You can see it here:


Not shown: These pix were taken a few years ago. I have since then added a used phone cord to my Lip Grippers - they float, just not away from me.


10.) Personal Kayak Cart
Depending on the region where you live, at some point you will get tired of dragging your kayak across the dirt/gravel/sand, and will have to break down and get a personal cart for your kayak. This will save you wear & tear on your kayak's underside, as well as, save your back and your legs in the long run. While there are numerous ways to make a kayak cart out of pvc pipe, there are also several ways to attach the said cart to your kayak. I will admit that I've tried making one out of pvc piping with failed results. There are two very good approaches to this dilemma.
If you have a sit-inside kayak, with NO scupper drain holes, then this maybe the ticket for you:
http://www.basspro.com/Ascend-Canoe/Kayak-Cart/product/12092409343771/
For those of us that have a sit-on-top kayak, a cart that plugs into your kayak's scupper drain holes, this maybe the *solution for you:
http://www.basspro.com/Ascend-Sit-On-Top-Kayak-Cart/product/12092409343777/
* Note: Some people left negative reviews on this cart option due to the fact the top & bottom bars have locking clamps, but also have two small locking buttons that must be pressed in at the same time in order to shorten the width of the axle to avoid them locking in place at the factory-set width. Once you have set up the axle width you want, then press the locking clamps down to hold it in place.
I live on the east coast, near Rhode Island, so I frequently launch in some pretty sandy spots. My kayak of choice is a 2009 Hobie Outback Mirage. When it's fully rigged up, it weighs around 120 pounds. My standard kayak cart broke a weld at the bottom, so I spent the extra money ($365), and got myself a wider kayak cart with Wheeleez beach wheels. They are overly wide at 12" and 10" tall, but they make dragging my kayak across deep sand a breeze. They also make it easier to transport over uneven terrain.
So, that's what I carry, and wear, when I'm out on the water. I like wearing the full coverage clothing in the summer to prevent sunburn, and to prevent that burning sensation you get from applying sunblock to sensitive areas (ankles, toes, nose, face, ears, etc.) that cause your eyes to tear up and burn for hours.
You can get away with making most of the items on this list yourself. Others will require you to get the real thing. Either way, you will have fun doing the little projects because it's something you took pride in doing yourself. Who knows? Maybe your friends will want you to make one for them as well!
I hope this helps you in the future, if you decide try fishing at night, bring a friend, and make sure your have a dry bag for your cell phone. Your GPS isn't just for the road!
As usual, keep those lines wet & tight!
Saturday, March 5, 2016
2016 - Back for another great season!
It's been awhile since I wrote something of interest on here. I'd like to start off by saying 2015 was not a very good year for me. Transport issues arose on my truck that caused me to miss a few outings with my kayak last year. Mechanical issues were costly, and let's not get started on my tire issues. I mean, I missed the same outing with my kayak fishing club for the 5th straight year in a row! With all that was going on, I limped around with my truck to finish out my season. I had to get 5 new tires AND a brand new spare rim for the new tire - the old spare tire was in excellent shape but the wrong size and the rim was ruined.


So, the truck has new tires all around, new U-Joints up front (that eliminates that noisy "clacking" sound), a new high-flow water pump from FlowKooler.com, and a brand new Magnaflow Stainless Steel Cat-Back muffler. These few parts will be a vast improvement over stock performance and gas mileage as well.
Well, the start of 2016 is off to a good start. We had a pretty "mild" winter. The warmer weather is quickly approaching with temps reaching 60º - 70º respectively for early March. The "New England Saltwater Show 2016" that's held at the Providence Convention Center in Rhode Island is the area's largest saltwater show in the region and annually draws in 15,000+ visitors every year. This year, we had the best attendance ever - for Friday, Saturday, and Sunday! The show is put on by my fishing club, the "Rhode Island Saltwater Anglers Association", and has help from its club members (89 attended this year) in various areas of the show. A show this huge has nearly 100 vendors!
For the second year in a row, I was asked by the club's president Steven Medeiros, to do a few free seminars each day - 1 on Friday, 3 on Saturday, and 1 on Sunday. My topic was: "Rigging a Kayak for Saltwater Fishing", where I go over how I set up my personal kayak for saltwater fishing. Another member of our group, Mona Rodriguez was with me, and we took turns discussing the different things we've done to our kayaks - both in modifications and expressed certain safety aspects that every kayak angler needs to know (and might never have known in the first place). Below is a pic of Me & Mona during a busy Sunday afternoon where people attended our 12:30 pm seminar.

This pic was taken last year and shows both my kayak & Mona's kayak and the mods we've done to our kayaks over the past 3 years. This year, I decided to have some "reminder" cards made up so people wouldn't have to ask me for my blog page and have me write it down. The cards were a hit!

Within our fishing club, we have a group formed the "Kayak Committee" that has special days set aside for those of us who fish out of kayaks. Earlier this year, I had the chance to sit in with a few other members and plan out the new dates in 2016 to fish this year. There were some places we omitted due to lousy fishing conditions as they weren't producing the same catch results that we've had in the past.
This year, there were 8 of us on the board, and we all agreed to meet at our chairman's house for coffee & coffee cake, and discuss this year's agenda for outings. A few of us had explored other launch spots that were major "hot spots" and are now part of this year's itinerary for the season.
At first, our season usually ended the middle of September. This year, we extending all way into the middle of October! The other members in our group were excited at the newer places and launch spots that we will be launching from, as well as, more dates in September, and more Saturdays to accommodate those who can't make it during the week due to work schedules - this was often brought up in the past at our dinner meetings during the end of the season.
All in all, this year will be a great year for fishing, and exploration of new spots for different species of fish. Hoping to see some new faces this year!
Monday, May 26, 2014
Oops! That's not supposed to happen!
Saturday, May 24, 2014, 6 pm
I posted on our kayak fishing club's private email board the other night about possibly launching at Ninigret Pond's "East Beach Parking Area". There are 4 spaces each on the left and right at the first parking entrance before the fenced area. After a certain time (11 pm), that main area gets chained off.
Anyways, shortly after I got geared up, I was joined by fellow RISAA - Kayak members Mo Rodriguez & Don Goodroe, which after a short walk across the parking lot, we headed down to the water's edge with our kayaks in tow and launched at what appeared to be almost high tide. We then paddled out to Hall Point, which was about 2.25 miles away. Once we got there, there was another boat with 2 men using fly fishing gear on a small skiff anchored in a shallow cove with a depth of about 2.5 ft. The cinder worms were barely present but the fish were making their presence known by splashing around at the very top of the water. They were everywhere!
We stayed until about 8:30 pm and started to head back. The wind was picking up while the clouds thickened. Our paddle back seemed longer because the wind was in our faces. Mo asked for an assist in turning on her mast light so we could be seen on the way back to the launch area. Don turned on his own custom made light. Then, I went to turn on my light, and all I got was nothing. WTF! That's not supposed to happen! Fresh batteries were installed last week, so I didn't know what the problem was. We decided to hug the East Beach shoreline on the way back because the depth was barely 2 ft deep. I turned on my red/green bow light just for some type of illumination. Oncoming boaters, if there were to be any at all, would have to pass on MY right, while the left was off limits because Mo had the right-of-way.
After we got back and all loaded up, I took apart my mast light to check the batteries, and found that the last battery was corroded and starting to leak. Also, I checked the lights, there are 2 small LEDs, one of which was completely burned out. I thought that to be somewhat odd because the mast is always stored under the rear seat of my truck. And, the top portion of the mast is sealed with an O-ring gasket, but I've never even had it in, or near the water. Even odder than that, LED bulbs take forever to burn out. That mast was only 4 years old!
I never thought that one day I would have to use my own idea and make my own lighted mast with safety flag! These ideas I come up with are for the frugal kayak fisherman who has a limited budget.
I did make the new mast but used the old flag off the old mast. I like the old flag because it's big, which makes you more visible out on the water. The mast was made by YakAttack and cost around $75 at the time. The mast I made cost about $35 - less than half of what the original mast cost! I do think that the light I chose is a lot brighter than the old mast light. The new light is powered by 3 "AAA" batteries, and is also a single LED lamp.
As for the action, you may ask? Mo was the only one who caught two schoolie Stripers that night in the 12" - 15" range at 7:30 pm. These are the two she caught out of her own kayak for the first time in saltwater since joining RISAA - Kayak last year (2013).

[Photo credit above: Jeff Hall]
Wednesday, March 5, 2014
Harbor Landing - Lynn,MA
Located in Lynn,MA sits a nice launch spot for kayak fishermen looking to fish in a cove with quick access to the Saugus River.
Enter: Harbor Landing. Located off of the Blossom Street Extension off Route 1A (Lynnway) in Lynn,MA. This launch ramp has plenty of parking for 25 trailer spots, is town owned, and open to all.
After visiting the Massachusetts Energy & Environmental Affairs page, they have some additional info to provide: * All of the ramps are either state, private, or municipally managed. Many ramps charge fees. Some have residency requirements.
Here's a view of the parking area. To the left of the dark colored car at the bottom left, that area is fenced off, as well as the perimeter of the lot.

This is another view of the boat ramp and the street extension which appears to be located in an industrial area.

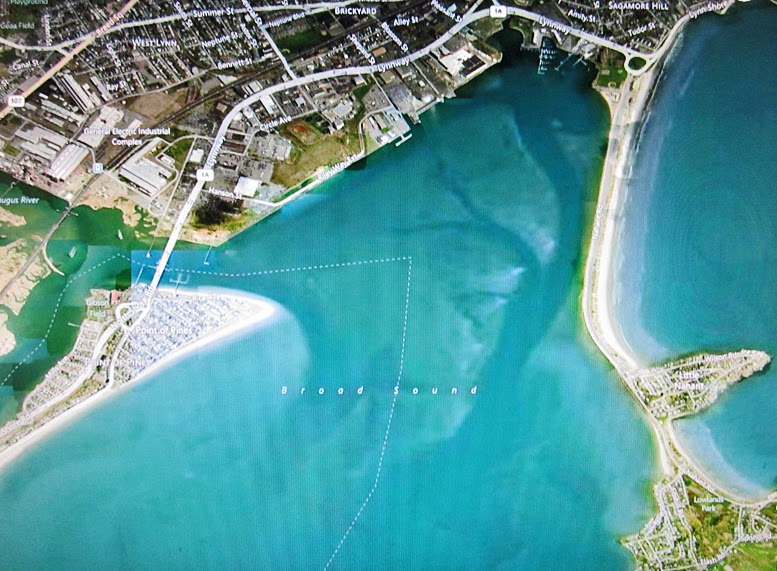
This is an aerial view of the area located on the Broad Sound just inside Boston's harbor area. There's a lot of shallow areas in the cove. Perfect place for a little night fishing adventure. At the top center of the pic (near the 1A route number), that building with the white roof is where the launch ramp is located. The darker areas are the deep spots, the shallow areas are highlighted in beige.
For a better weather forecast for that area of Boston, go here: http://www.boatma.com/bostoner.html
Enter: Harbor Landing. Located off of the Blossom Street Extension off Route 1A (Lynnway) in Lynn,MA. This launch ramp has plenty of parking for 25 trailer spots, is town owned, and open to all.
After visiting the Massachusetts Energy & Environmental Affairs page, they have some additional info to provide: * All of the ramps are either state, private, or municipally managed. Many ramps charge fees. Some have residency requirements.
Here's a view of the parking area. To the left of the dark colored car at the bottom left, that area is fenced off, as well as the perimeter of the lot.
This is another view of the boat ramp and the street extension which appears to be located in an industrial area.
This is an aerial view of the area located on the Broad Sound just inside Boston's harbor area. There's a lot of shallow areas in the cove. Perfect place for a little night fishing adventure. At the top center of the pic (near the 1A route number), that building with the white roof is where the launch ramp is located. The darker areas are the deep spots, the shallow areas are highlighted in beige.
For a better weather forecast for that area of Boston, go here: http://www.boatma.com/bostoner.html
Monday, February 17, 2014
Third Beach - Middletown,RI
On an outing last year with our kayak fishing group, the "Kayak Committee", a sub-club within the Rhode Island Saltwater Anglers Association, I had the chance to visit a new launch site that I've never been to.
Located in Newport County, RI on the Sakonnet River inside the southern portion of the Narragansett Bay lies a hidden gem for kayak anglers, and it's called Third Beach.
Third Beach is located on the island of Newport,RI which is accessible via a pay toll - both to & from the island. Cost is based on $2.00 per axle. Example: a 4x4 truck is $4.00 one way, and $8.00 round trip, as of 2013.
Third Beach is also hot spot for beach goers and paddle enthusiasts. Kayaks and stand up paddle boards are available for an additional fee. Those wishing to fish out of their kayaks, must get there before 8 am, otherwise they will face an additional fee just to park there.
In the photo below that was taken in the fall, it does not show the guard shack at the entrance to the parking area, but it also shows that though there is a lot of land, only half is paved while the other is grassy.
Do your best to get here early, as the parking lot tends to get overcrowded by 11 am in a hurry.

Here's another aerial view (below) of the launch site on the center/left, along with the area we fished at on the tip of the cove area (center). The white markings in the middle are actually rocky reefs, as is the rocky coastline heading south from the tip of the land mass, a favorite spot for all kinds of fish - Striped Bass, Bluefish, Flounder, Blackfish, and Tautog.
* When the wind picks up, head in quickly, because the swells near the reefs can get dangerous!
My Eagle fish finder was literally covered in black because of the massive amounts of fish in the area near the tip of the cove. I had several strikes on tube rigs and eel rigs. There aren't too many outings that I've been on that get me excited, but this was one of them! I will try to get out there before the season's end in the Fall 2014..
The pathway on the land's mass is part of a nature preserve with walking trails for bird watchers, and an observation tower at the tip.

Pleasure Beach Boat Launch - Waterford,CT
I've mentioned in the past about local boat ramps that I use to go fishing nearby, all within a tri-state area (Connecticut, Rhode Island, and Massachusetts), and this is my first post on that.
I first heard about this launch site when I had hire a new guy to remove snow off my 600+ ft driveway. We got on the subject of fishing from a kayak and how the launch ramp I was using was not the greatest to access the Long Island Sound. The outgoing tide coming out of the Niantic Cove, Niantic,CT was dangerous, to say the least. So, he mentioned that he launches from a small boat launch area in nearby Waterford,CT off of Dock Rd. Because we fish at dusk, parking is free.
Here's a brief description of the area:
Let's take a look at the area (West). This is the Pleasure Beach Boat Launch located off of Dock Road, which is a short paddle across Jordan Cove to the warm water run off behind Millstone Power Plant. Ample parking is located to the left when you pull in. Restrooms are across the parking area. A smaller parking area is reserved for the beach residents only. Located to the left of the boat ramp, this is a hot spot for surf fishermen that fish off the rocks. Pleasure Beach is situated to the far left of the photo below.

Here's an aerial view (North) of the boat ramp and of Jordan Cove. The small bridge connects to the boat launch area is extremely narrow and has a weight limit.

And, here's another aerial view (North) of the boat launch (far right), including Jordan Cove (mid top center/top right), and Millstone Power Plant (far left). The beige colorings show the shallow spots in the cove area, while the darker hues show the deep spots within Jordan Cove.
A hot spot for fishing activities is at the mouth of the warm water run off behind Millstone Power Plant which is a known hangout for Striped Bass & Bluefish.

I first heard about this launch site when I had hire a new guy to remove snow off my 600+ ft driveway. We got on the subject of fishing from a kayak and how the launch ramp I was using was not the greatest to access the Long Island Sound. The outgoing tide coming out of the Niantic Cove, Niantic,CT was dangerous, to say the least. So, he mentioned that he launches from a small boat launch area in nearby Waterford,CT off of Dock Rd. Because we fish at dusk, parking is free.
Here's a brief description of the area:
Pleasure Beach
Pleasure Beach is one of the many beaches in Waterford, Connecticut. It is located at the end of Dock Road. Not only does Pleasure Beach have a beach, it is also the location of a public boat launch. Pleasure beach is part private and part public. The membership cost for a family of four is $825.00, which includes the new member fee of $500.00; this is for the first 3 installments – total cost is $1,500.00; the assessment fee of $250.00; this includes 2 free badges per household, the extra badges fee of $50.00, and a $25.00 cost for each additional badge; children of eight and over are required to wear a badge, and the voting member fee, which is $25.00 for one person to vote. To become a member you have to live in certain boundaries. The private side membership includes attendance to all beach activities. Some activities in the past are cocktail parties, beach cleanup at the start of the season, sand castle contests, and an annual beach picnic. The public side is marked and is open to the public with a path down to the beach and a parking lot a short walk down.Let's take a look at the area (West). This is the Pleasure Beach Boat Launch located off of Dock Road, which is a short paddle across Jordan Cove to the warm water run off behind Millstone Power Plant. Ample parking is located to the left when you pull in. Restrooms are across the parking area. A smaller parking area is reserved for the beach residents only. Located to the left of the boat ramp, this is a hot spot for surf fishermen that fish off the rocks. Pleasure Beach is situated to the far left of the photo below.
Here's an aerial view (North) of the boat ramp and of Jordan Cove. The small bridge connects to the boat launch area is extremely narrow and has a weight limit.
And, here's another aerial view (North) of the boat launch (far right), including Jordan Cove (mid top center/top right), and Millstone Power Plant (far left). The beige colorings show the shallow spots in the cove area, while the darker hues show the deep spots within Jordan Cove.
A hot spot for fishing activities is at the mouth of the warm water run off behind Millstone Power Plant which is a known hangout for Striped Bass & Bluefish.
Subscribe to:
Posts (Atom)