Thursday, July 4, 2013

So...., has "Mother Nature" finally decided to play nice this Summer?

     After a rather soggy start this year for fishing season, 11+" for June last month, we finally see the sun return for a few days in anticipation of our next outing at Fort Wetherell in Jamestown,RI on July 9th.

     Lately, I haven't been on here writing as much, because of the lousy wet start to fishing season. Though I have been out by myself a few times this year, the fishing has been dismal to say the least. Even though there wasn't any rain to deal with, the wind has been relentless lately, causing sea swells to reach 4-6 ft in height. So, I paddled around 2 salt ponds in RI - Ninigret Pond & Quonochonotaug Pond.

     However, when it rains, I came up with a bunch of new designs featuring a kayak fishing theme. They are up for sale in my Cafe Press store, "CORE 860", and have been steadily increasing in sales. Some are sold by region. So, if you don't see your region, feel free to message me and I will set out and create a region or country for you.

     When I participated in the "Rhode Island Saltwater Show" this March, I waited until the last day to scoop up some deals from Salty's Saltwater Plug Kits. I picked up 5 "Bomber" kits, which are now discontinued from their kit line up. I opened up one of the kits to begin waterproofing it. Though, there is literally no way to 100% waterproof the plug because water will manage to get in there somehow. So far, I have 2 good smooth coats of clear on it. I have a perfectionist attitude, so I want it to look sharp and mistake-free (no drips or runs).
     I have a design in mind, but I need to practice getting it down just right. It will require the use of a few stencils that I rarely use but should add some depth and dimension to the surface.

    So far, this is the only pic I have from June 8th's "Meet & Greet at Goddard Memorial Park" in East Greenwich,RI.. The day started out with sun & clouds, which was nice at first, but the wind picked up and pretty much blew me out of the cove. But it was probably the nicest day the Kayak Committee ever had, with a good turn out, and plenty of good conversation about how we all rigged our kayaks for fishing.

    My gear basket got many good compliments about how clean and well built it was. I told everyone who asked, that I can't take full credit for the setup. I merely told them that I borrowed the idea from another person ("Gramps") on Ultimate Kayak Fishing and adapted my own little tricks such as: the Lip Gripper holster, the addition of Reflective Tape to the sides of the top box, and Acrylic Sheeting inside the top box portion to keep the fish hooks from getting caught in the rungs of the top box.
    Others commented on the fact that my sonar's transducer is located inside my kayak's hull, along with a small 12v marine battery inside a dry bag. I mentioned, that whenever I beach it, whether it's sandy or full of stones, I know my transducer will be protected because it's located inside the hull, and has no problem reading as deep as 600 ft..


     Pic taken by me. My kayak is the beige-colored one on the end at the far right with the big orange flag.

Saturday, March 16, 2013

The "New England Saltwater Show 2013" was a huge success!

     A year ago, I joined a fishing club in RI called the "Rhode Island Saltwater Anglers Association" (RISAA) after attending a saltwater show at the Providence Convention Center. It was a huge show that encompassed everything saltwater - baits, jigs, flies, saltwater plug kits, fishing rods, reels, charter boats, boats, trucks, jet skis, kayaks, navigation equipment, maps, trophy catches, and more!

     I picked up a magazine that turned out to be the club's newsletter. Inside, I found out that they had their own kayak fishing-based club called, the "Kayak Committee".  I met up with the group at Goddard Memorial Park in East Greenwich,RI . I was approached by the chairman of the committee, David Pollack *, and was asked if I'd want to join. Of course, I said, "yes", since none of my friends would join me on a fishing outing.  * David Pollack is also the chairman for the Fly Fishing Committee and the Surfcasters Committee, too. 

     Here in this pic, this is David, in the blue shirt with red suspenders, working the Fly Fishing Committee booth at the show teaching a young boy how to tie his own fly. Our Kayak Committee booth is on the right.


     After being in the club for a year, I have attended some of the free seminars on the last Monday of every month. I've also gotten more involved with the club's activities. One of which was the "New England Saltwater Show at the Providence Convention Center, Mar.8-10, 2013.

     What made this show extra special this year is that for the first time in the show's 10 year run, this was the first time the "Kayak Committee" was offered a booth within this massive show. Two of our members provided their own kayaks, so the public could come and get a close up look what each kayak could do once it's outfitted with the right components to get the job done.
     One kayak was a yellow Ocean Kayak "Torque" (owned by Dave Guilliano) with the motor in the stern, gear basket, lighted safety flag, GPS/Sonar, trailer/dolly, and multiple Scotty mounts. The other was a orange Wilderness Systems "Tarpon 120" (owned by David Pollack) that was set up for saltwater fly fishing, which also had a GPS/Sonar, several Scotty mounts, anchor trolley, trailer/dolly, and a lighted mast.

     Dave Guilliano, owner of the Ocean Kayak "Torque" was also doing free seminars with another Committee member, Bob Oberg, on "Targeting big Striped Bass off Block Island,RI." at the main stage at the opposite end of the show. So periodically, we had to move the tables, so he could lug his kayak to the main stage area.

     There was myself and two other members of the club manning the booth during our selected weekend shifts. Mo brought her laptop with a Power Point Presentation of all the selected Kayak Committee Outings that we ventured on. David Pollack & Wade Diehl brought their LCD Photo Frames to showcase past outing successes too. Although, I opted to stay 4 - 5, I ended up staying 8 -10 hours - long after my shift was over - including the break down portion of the show on late Sunday afternoon.

     During the show on Saturday, I was starting to lose my voice trying to explain to people what a "Gear Basket" looked like. So, on Sunday, committee member, Mo brought her gear basket and lighted safety mast with flag that I made for her, as a demo piece. Several people commented on it stating that I should "sell" the idea online. I noted that the initial idea was borrowed online from a forum site, and could also be found on this blog page on Google's Blogger.

     Here in this pic, I'm demonstrating the storage space within the gear basket, and the reasons why I made the modifications - including what key items I carry inside the lower gear basket portion.


     I just incorporated my own ideas into making it better, such as: reflective tape on the upper "Go-To Lure Box", the holster for the floating fish pliers (with recoil cord so the pliers don't get lost), bungee attachment cover system, and the Homemade Lighted Safety Mast with Flag (which costs less than $30 to make).    Others were blown away at how many items could be nestled into such a small space. Although I referred to it as a "Gear Basket with the Go-To Lure Box", by the end of the show, I was calling it the "All-in-One Tackle Station".

     Here in this pic, I'm showing a potential new member the added benefit of having a lighted safety mast with flag and a removable mast light when it's not needed. 


     In the end, we managed to garner 15 new people who were interested in joining our committee, which would bring the committee membership from 35 members, to a total of 50+ members! It was a great show and I'm hoping we can bring more kayaks and more members to next year's show to help participate. This will go to show the people that you don't need a big boat to catch big fish. We, too, can get the same results by doing it from a kayak!!!

Saturday, March 2, 2013

New shirts for people that fish out of kayaks!

     I have an insane passion for kayak fishing. And, it's a little more insane than the usual kayak angler. For one, I have 2 Facebook accounts. One is for myself, and the other is for my fan page, "CORE 860", which is a site that highlights my adventures outdoors. I used to do a lot of 4 wheeling when I was younger, but between vehicle breakdowns, land closures and developmental building, those fundamentals alone have pretty much ruined that hobby.
   
     So, I turned back to my original passion for fishing. I wanted to fish, but not from shore. All the good fish don't hang out near the shore. They're in hiding amongst the lily pads, or under docks or mooring points, places you can only get to if you have a boat or a kayak.
   
     I sold 2 vehicles and purchased my first kayak (that's me pictured on the right inset picture), a Hobie Outback with the Mirage-Drive pedal system. It is 12 feet long, can hold up to 400 lbs of gear, and can be used on ponds, lakes, and inshore fishing. Though, I prefer to use mine in saltwater, I also use it on freshwater ponds and lakes close to home. I often carry a digital camera with me and take photographs of what I see and then post the photos in a special album on my fan page on Facebook.

     At one time I had an online store where I sold outdoor equipment. I had it up and running for a little over 5 years. After no sales were made, I wisely closed the shop. The wholesale vendor I was using ended up being a total waste of time.  I eventually closed the shop portion, but kept the site open as a personal outdoor blog, until about October 2010, then I discontinued the website altogether.

     But, I had always envisioned myself selling decals and shirts. I had loads of ideas of what I wanted to sell, and most of the ideas were sport-related niche ideas - fishing, hunting, hiking, camping, 4 wheeling, and kayaking.

     So, I turned to Cafe Press, an online designer of all things tangible that can be printed on. Shirts, mugs, clocks, cell phone cases, etc.. I opened up my first premium shop in 2007, "CORE 860", and have had over 2000 sales - all with no returns ever. People from all over the world can buy my merchandise because Cafe Press does the inventory stocking, printing, shipping, and credit card transactions. All I have to do is provide the ideas. I have a very goofy mind, almost child-like in a way, at coming up with the most bizarre concepts, and oddly enough, the people who buy my products are mostly women! I guess I'm not the only one who thinks like this either!!!  I try to keep most of my focus on products that are family friendly.

     Just out of curiosity, I entered into the search box at the top of the screen, "kayak fishing", just to see if anybody made shirts or decals relating to this subject. A moment later, the search results turned up products that had to do with either kayaking, or fishing, but rarely a product turned up for "Kayak Fishing" . I mean, there were a few (well, very few) that were somewhat about kayak fishing.

     So, I had an idea. There are many people around the world that kayak fish in the country that they live in. So, I figured, why not place a custom design on the front of the shirt, and then place an all new country-based design on the back of the shirt. I had 8 countries, and 2 sub-regions, already written down, so I set out to my favorite online font generator, and proceeded to design some new font styles to use on my shirts.
     Now, Cafe Press already has a myriad of different fonts at their disposal, but the fonts I use are, in my opinion, better than what Cafe Press has to offer. Although, there are a few designs that do incorporate their font styles like: Garamond, Futura, and Ticonderoga, that are already in use on some of my designs.

     I have 5 designs that I use on my shirts: "Gut Fish?", "Master Baiter", "Saltwater Soldier", "Walkin' the Dog!", and "Fish or Die!". All of these come in Long Sleeve Shirts & Short Sleeve Shirts for both Men & Women - in your choice of Black or White shirts.

     The countries that have available for "Kayak Fishing" are:

     American Kayak Angler
     Australian Kayak Angler
     British Kayak Angler
     Canadian Kayak Angler
     Irish Kayak Angler
     New Zealand Kayak Angler
     Scottish Kayak Angler
     Puerto Rican Kayak Angler

     And, 2 sub-regions - one for the southern folks, and one for the New Englanders:

     North East Kayak Anglers (New England-based)
     Rebel Kayak Anglers
     
     I also have an extensive array decals for kayak fishing, 4 wheeling, kayaking, fishing, and other outdoor-related activities.

     To visit my store on Cafe Press, please click the link here:
http://www.cafepress.com/core860_store


Sunday, December 30, 2012

New Shirt Designs for Kayak Anglers coming in 2013!

   I've begun creating new designs for kayak anglers in my Cafe Press store based upon their region. So far, I have 5 new font designs for the following 4 regions: British Kayak Anglers, Irish Kayak Anglers, Canadian Kayak Anglers, and one for my region here in the US, the New England Kayak Anglers.


   They're not designed to be clubs, but instead, can be used to show off that you're a proud kayak angler from the region that you fish out of. The shirts will also feature the highly popular & humorous "Gut Fish?" and the newly created, "Master Baiter" designs on the front, and a silhouette of a kayak angler on the back, with the country's region placed at the top of the silhouette, and the words, "Kayak Anglers" at the bottom underneath the silhouette. Some shirts will also feature a small kayak angler silhouette, or a euro-style decal design with regional letters: CKA, IKA, BKA, NEKA on the upper left chest pocket area.


   A new addition to the short sleeved T-shirt category is the new Men's Performance Moisture Wicking Shirt. This shirt is designed to be worn in high heat areas. It's available in Men's & Women's versions AND, it only comes in White.


   The big difference you will see this year, is the fact that there won't be any web addresses at the very bottom of the shirts. In the past, I had (and, still have) shirts and decals with web addresses linking to my personal outdoor journal (website). Since I don't have my website anymore, I want to promote my Google Blogger page, "Kayak Fishing Country" and my Facebook fan page for "CORE 860".  I need to include both web links on the decals in order to get recognition for both sites. I will still offer the web address for my Cafe Press store at the very top of the 3" x 10" decal.

   Keep an eye out for all new designs next year!

   My store: http://www.cafepress.com/core860_store/

Sunday, December 23, 2012

Adding a Dual Red/Green Bow Light to your Kayak

   This is Part 2 of the "Adding a White Light to your Kayak" project. The kit mentioned in the previous project came with both a White LED Light (back/stern), and a Red/Green LED Light (front/bow). I made an adapter that mounts to my RAM mount under my Fishfinder. Since the dual color light came with the kit, I figured why not use it? I'd be happier knowing that I look like a small boat, rather than looking like a target out on the water.

   This kit by Attwood Marine, can be purchased at Wal-mart for $30, and intended to be used on smaller boats that didn't come equipped with navigational night lamps. 


* * * NOTE: Each state is different concerning lights on a small vessel, which is mandated by the US Coast Guard. For most of us, a single white light will do. Your decision to use this light is solely up to you. And, for those of you who will leave negative comments about this project, look at the packaging again, and take notice of the small jon boat (8-10 ft in length) pictured, noting that the angler is anchored with both the white light at the back and the dual red/green light up front. He sits no higher, or lower, than we do in our kayaks. Using the dual Red/Green lamp DOES NOT mean one has to be moving! * * *


    Parts List:
   ( 1 ) Attwood Portable Navigation LED Light Kit - $30
           Attwood Marine's Portable Navigation LED Light Kit

   ( 1 ) Piece of Aluminum Plate 1/8" thick x 6" length x 4" wide

   ( - ) Misc. Marine Grade Fasteners - (i.e. bolts, washers, nuts)


Here's how I did it:

1.) I used a piece of scrap diamond plate aluminum for this project.

You may want to use a piece of plate that is flat on both sides. Check with your local town garage for some scrap road signs that have been run over or mangled.


 2.) I used my RAM mount piece to trace out a rough design to incorporate the size of the piece that I need to use.

I marked out where I need to drill my holes.


 3.) Though it's not shown, I used a C-clamp to hold my RAM mount base in place so I could drill my mounting holes straight and keep them aligned perfectly.


 4.) With all the holes pre-drilled, I clamped down the plate so I can cut out the piece.


 5.) I used a Saw-Zall with a fine tooth metal cutting blade. Carefully, cut the out the design piece while keeping the saw's blade straight.


 6.) * Not shown: I used a Die Grinder to cut off the remaining piece behind the plastic fish finder mount.

I then used a 3M grinding wheel to remove the burrs from drilling the holes, the sharp edges from cutting out the plate, and rounded off the corners and edges.

I then mounted the parts in place.


 7a.) Shown from the left, with the unit on.


  7b.) Shown from right, with the unit on.


 8.) Shown mounted on my kayak, from the right, with the unit on. (yes, the kayak is upside down)


   Just a final note:  When this piece is mounted in place, you won't be able to open the forward hatch. But when you're sitting on the water in total darkness, you won't really have a reason to go up there anyway. I usually leave the RAM mount slightly loose, so I can turn the whole unit sideways, if I have to fetch something in the forward hatch, if I have to.

Saturday, December 15, 2012

Adding a Orange Flag to your Lighted Safety Mast

   In a earlier post, I showed you a way to make an inexpensive lighted safety mast. This is yet another way to increase your safety out on the water - especially if your fish in the saltwater.

   While the lighted safety mast works great at night, this article will help increase your being more visible during the daytime hours, as well as being more visible at night.

   One way to do that, is to add a bright orange safety flag to your mast, to aid in being more visible during deep ocean swells, and motorized boaters from a distance.

   The club I fish with in Rhode Island highly recommends that a safety flag be used on ALL club outings.

   Starting with the Lighted Safety Mast that was featured in my last article, I will show you how to add a bright orange flag to your lighted mast.


   Parts List:

   ( 1 ) 18" x 18" Orange Vinyl-Coated Nylon Flags w/ Staffs ( 2 pk.) - $7.68/pr.
           2 pk of 18" x 18" Orange Safety Flags w/ Staffs

   ( 3 ) 3/32" x 2" long Machine Truss Fasteners - $1.18/ea. ( 4 pk. )
           4 pk of Machine Truss Fasteners

   ( 3 ) 3/32" Stop Wing Nuts - $1.18/ea. ( 6 pk. )
           # 8 Wing Nuts


   Depending on your skill level, this project shouldn't take longer than 30 minutes.

   Let's begin:

   1.)  You can find this "Safety Flag" in the safety section of a Home Depot store. It's approximately 18" x 18", a highly visible orange, and sells for under $20.

   * * * NOTE: The flag pictured was purchased at a different store, but the kit install is still the same.


   2.) Be sure to have the flag extended outward, and carefully mark 3 areas under the flag along the wooden dowel to drill your holes, making extra sure that the holes you intend to drill are centered correctly. Because the dowel is round, you may have make a "flat spot" on the dowel so your drill's bit doesn't wander while drilling the hole.


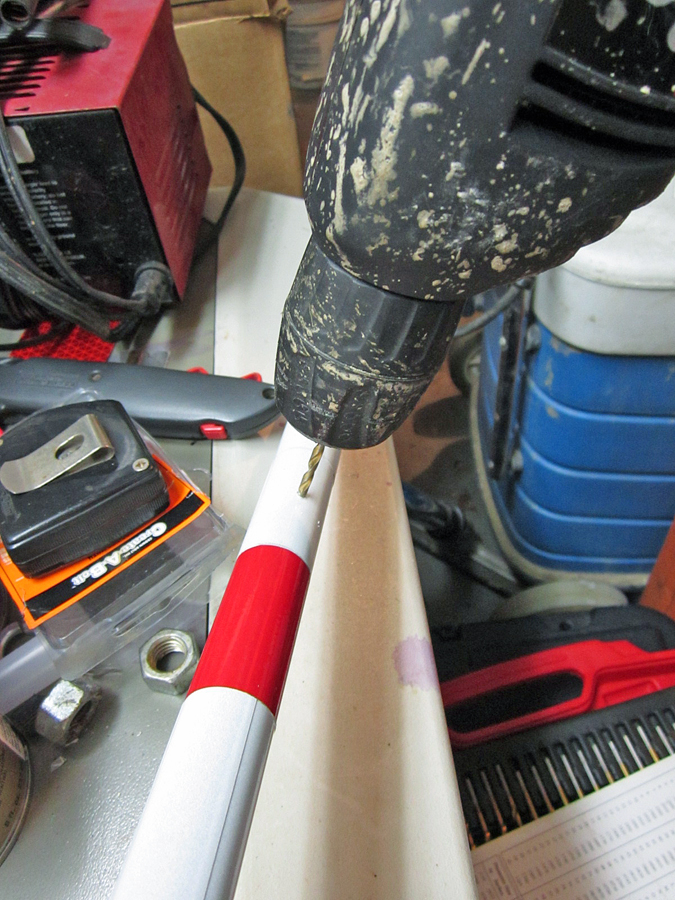
   3.) Using a 1/16" drill bit, carefully pre-drill your 3 holes straight through the center of the dowel as best you can. These will act as "guide" holes for the larger 3/32" drill bit after you're done with these.


   4.) Now, in the same 3 spots you used the small drill bit, use a 3/32" drill bit to enlarge the holes. Be careful not to drill the holes off center or the dowel may split and break.


   5.) Depending on your tools, I used small spring clamps to hold my flag's dowel firmly attached to the mast. Make sure the flag is below the top of the mast, otherwise at night, your safety light won't be seen with the flag in the way. You will need to drill through both the wooden dowel and the safety mast pole.


   6.)  I used 6 parts. I picked up ( 3 ) 3/32" x 2" long Machine Truss Fasteners and ( 3 ) Stop Wing Nuts. Push the ( 3 ) Machine Truss bolts through the safety mast and the safety flag staff. 


   7.) Attach all 3 bolts with the wing nuts.


   8.) This is what it should look like when it's done.


   * * * NOTE: This particular flag measured at 12" x 14". Because this flag doesn't show up in the Cabela's search, I substituted this flag for a larger 18" x 18" flag that can be purchased at Home Depot. The mast I used measured at 40" in length. Because the Home Depot safety flag is much larger, you may want to cut your mast to 50" in length, so that when the wind shifts in direction, the flag's bottom edge won't be slapping against the back of your head!

   
   This is the actual flag I made for a friend. She used it at Monahan's Pier in Narragansett, RI in August 2012. The swells got bigger as the weather slowly got uglier. It's nice to know you can now be seen with the added safety of a flag.


How to make your own Lighted Mast

   We all want to be seen out on the water. And that's a good thing. Just because some jerk got his boater's safety course certificate and passed, doesn't mean he rules the water. Whether you fish or paddle, freshwater or saltwater, you need to be seen out on the water so you don't become the next casualty.

   In this article, I will show you a way to make a good lighted mast. And, it won't cost you a bundle. I will include the price of the parts, where I bought the parts, the tools used, and how to assemble it.

   An excellent version out there is the Yak Attack VisiCarbon Pro. I have an older version with a orange safety flag that measures 10" x 12". The newer VisiCarbon Pro's orange safety flag now measures 4" x 12" - which makes it look more like a sock flapping in the wind. I think they're a little overpriced at $60 - $70.

   Adding a U.S. Coast Guard-approved White Light to your Safety Mast - For use on the ocean or saltwater ponds at night. Can also be used on freshwater lakes and ponds too.

   This new idea is not as much as some models out there.

   Parts List:
   ( 1 ) Attwood Marine Portable LED Navigation Light Kit - $30
           Attwood Marine Portable LED Navigation Light Kit
   ( 1 ) ¾" Inside Diameter PVC Drinking Water Pipe, cut to 50" length - $3.40
           1" dia. Drinking Water Pipe - cut to 50" length
   ( 1 ) Package of Reflective Safety Tape (2 Red /2 White) - $3.00 ea.
   ( 2 ) ½" long Arrow Fastener Aluminum Pop Rivets (50 pk.) - $6.00

   To install the pop rivets, you will need this tool:

   ( 1 ) Arrow Fastener Professional Rivet Tool
           Professional Rivet Tool

    This version is legal, and almost half the price of the Yak Attack version above.
    
   Let's begin:

   1.) For this project, you will need a 50" pipe with a ¾" inside diameter, and dress it up with Red & White Reflective Tape as shown below. 

   * * * NOTE: The purpose of adding the safety tape is simple. Some people can't see at night very well, so they opt to use a hand held spotlight to see where they're going. By having reflective tape on your kayak, lighted mast, and paddle, you'll stand out a lot better to avoid a collision.

   I bought a 2" x 6" pkg. of red / white reflective tape. I covered the top mast portion with one piece of 2" x 2½" red reflective tape first. Then, I used two 2" x 2½" pieces of White Reflective Tape, one on top of the other, to make a 4" wide section of White Reflective Tape. Then, I finished the bottom section with 2" x 2½" Red Reflective Tape. So, it looks like this:


   2.) I got this L.E.D. Navigational Light Kit from Wal-Mart for $30. 
It includes three 8" post sections that screw together, and some hardware.

We will need just the top post portion (the one with the grey clip at the end) for the white light.


   3.) Using the post with the plastic light attachment at the top, 
I'm going to drill two holes for the ( 2 ) rivets through the safety mast and the light post at the same time.

   To hold the inside post in place, I wedged a small flat head screwdriver down the inside pipe.


   4.) Using a 1/8" drill bit, drill two holes. Just drill the hole into the mast and the light post - but NOT all the way through.

   The first hole was drilled 1" from the top, then drill a second hole roughly 4" under the first hole.


   5.) Next, I used ( 2 ) pop rivets that were 1/8" in diameter, and about a 1/2" long.


   This is what it should look like so far.


   6.) Because this is a different size pipe, it won't fit properly in your # 241 Scotty mount. So, we are going to grind off a little bit at the bottom.

   This Scotty Mount is attached to the side of my gear crate: No. 241 Scotty Mount

   Using a grinding disc pad that I attached to my drill, grind off the last 2" from the bottom.


   7.) The finished product - without the flag. You may have to push and twist the mast into the # 241 Scotty Mount for a snug fit.


   The reason I chose this particular kit is because the CREE LED lamp lasts a lot longer and is a lot brighter than the other older incandescent lamp kits on the market.
   It also can be seen from over a mile away!


   * NOTE: Starting in 2016, the US Coast Guard & your local Conservation Enforcement Officers have been doing random "spot checks" on kayakers that fish at night. The first offense may get you a warning, but the second offense, may result in a steep fine. Do yourself a favor and make yourself a lighted mast with a orange (or, red) safety flag. The project costs less than $50 to make - considering YOUR life is worth a whole lot more!