Tuesday, October 3, 2017

New Toy, New Troubles - Plastic Welding 2

    Confused about the new blog title? You shouldn't be, because this month's blog is a sequel to February 2017's "Plastic Welding" topic, with the major difference being that instead of repairing a small gouge-like crack in the bottom of my Hobie's hull, I bought a used kayak with structure cracks on the top of the hull.

    Here's the story of how it all started:

    Our kayak fishing club (RISAA.org) has what we call an annual "Meet & Greet" in early June on a Saturday at 10:00 am at one of Rhode Island's largest free parks. Last year, the state of Rhode Island completely redesigned the parking area and replaced the badly damaged boat ramp with a brand new ramp. I like to get there early and set up my kayak as if I was going to go fishing, but instead we just set up our kayaks in a row so that others can casually walk around each kayak, take pictures of how each kayak is set up, talk with their prospective owners about why they set up their kayak that way, and to check out the gadgets that each kayak has while the owners describe how everything works. The local U.S. Coast Guard Auxiliary was on hand to give out free inspections to our kayaks for those of us who wanted that done.


In the above photo, I'm holding one of two 9 foot graphite salt rods that I have with me when I'm out on the water. My 2009 Hobie Outback is at my right.

Photo #1 Credit: Mona Rodriguez


In this photo, I'm showing a father & son some of the upgrades that I've done to my kayak. That orange kayak in the background is a 2013 Feelfree Moken 14, and is the subject of this month's blog post.

Photo #2 Credit: Mona Rodriguez


Those of us that attended, and showed off our kayaks, gathered for a group photo along with the US Coast Guard Auxiliary members (kneeling in the front).

Photo #3 Credit: David Pollack

Anyway, one of our members showed up with his kayak, but didn't set it up. He stated that he hurt his shoulder, and can no longer pick up his 85 lb. kayak anymore, but was willing to sacrifice selling it for $500 - but only to members of RISAA (he told me he was asking $900 originally). I started to look over his kayak thoroughly because I had been looking into getting a bigger kayak for offshore use. As I was inspecting the top of his kayak, I noticed the sides of the kayak had structure cracks in the hull. The cracks appeared before, and after the gear track rails, at both the front, and rear of the kayak's top edge. I thought to myself, this is my chance to snag a really nice offshore rig, and write another detailed blog about the benefits of plastic welding, as well as write about the additions I plan to make on this kayak. So, I saved up for two months, and I told him I'd be over around 6 pm to pick it up.


As you can see, this kayak is huge at 14 ft 8 in long, and sticks out the back of my truck just a wee bit. It came with a nice padded seat and a Scotty Mount adjustable rod holder. This model features the "wheel-in-the-keel", but I will get my own trailer for it.

Photo #4 Credit: Jeff Hall

Here are some of the cracks that I noticed once I got the kayak in the garage. To the casual observer, seeing these cracks would've turned off a lot of people, almost to the point where people would've scoffed it off as a total loss.


Left Front Rail - Rear crack


Right Front Rail - Rear crack


Right Front Rail - Front crack

Photo Credits #5, #6, & #7: Jeff Hall 

To really get an in depth look at what I was up against, I did one gear track rail at a time, so as not to confuse myself with what rail came from what side. First, I had to remove the screws from the track channel. The two screws farthest away from the forward hatch came out easily. The two screws closest to the forward hatch, didn't come out as easily as I had hoped. I opened the front hatch and stuck my hand inside to feel around for the other end of the screw. It turns out that someone at the factory used a *plug to set the screw in place better. I grabbed the plug with a set of vise-grips and the screws finally came out. 
*NOTE: Save those plastic plug pieces as you will need them to re-attach the screws.

When I finished removing all the screws from the channel, I couldn't get the rail out off the kayak. So, I used a flat head screwdriver to carefully pry it out, being extra careful to keep an eye on the edge. After I got the rail out, I noticed that the rail had been forced in place - from the factory! Just laying the rail in revealed that the rail was 1/16" too long! I had originally thought that the previous owner had dropped the kayak on its side damaging the hull, but this wasn't the case. The rails were simply too long for the molded channel. By forcing them in place, the kayak's hull became compromised with the extra stress on the hull.


Photo #8 Credit: Jeff Hall

* * NOTE: In an effort to keep up with the plastic welding details, I had lost the original photos and had to "substitute" the next bunch of photos with that of an old ATV fender. The fender was bright yellow, but I changed the color with a photoshop program. So, as you will see, the methods to weld plastic still apply here. 
*WARNING* Wear gloves when handling the plastic welding tool!

This is the plastic welder tool that I use. It can be found at Harbor Freight Tools for $17.


Photo Credit: Jeff Hall

Starting with photo #5, this area of the kayak had one of the largest cracks in the hull. 
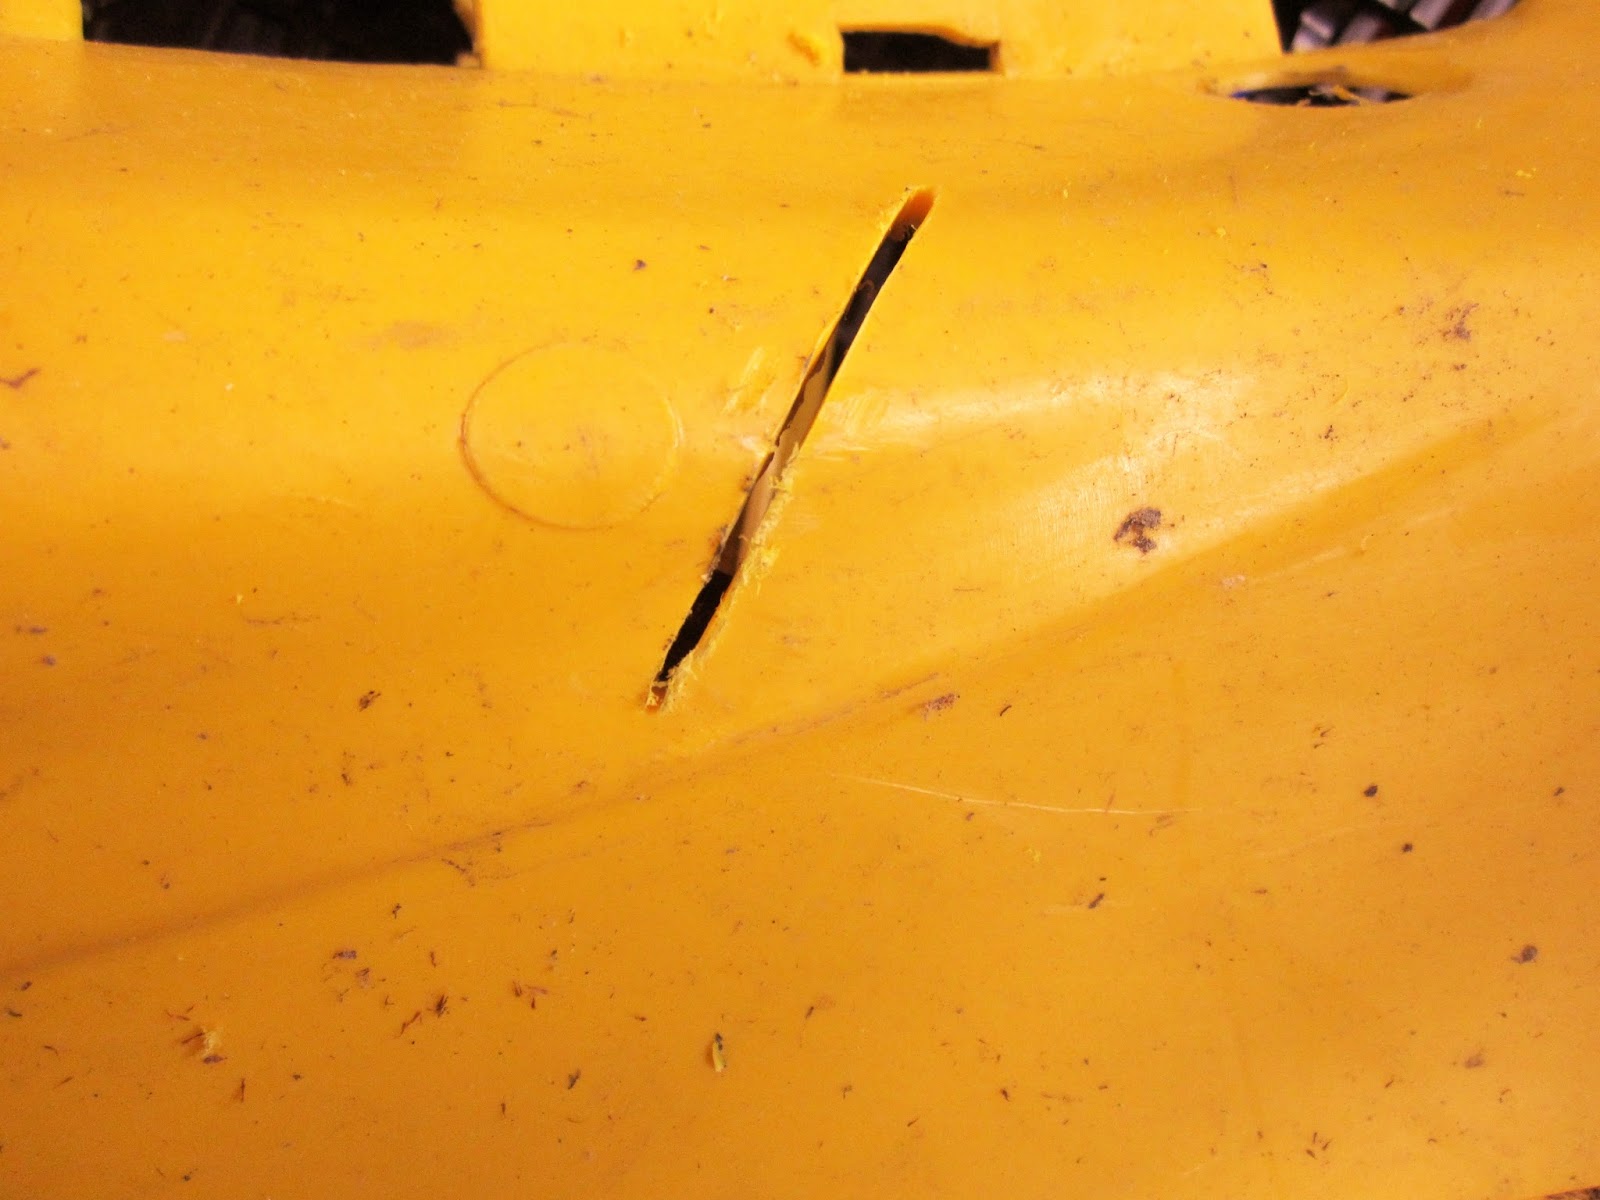

Photo #9 Credit: Jeff Hall

I start off using a Dremel Rotary Tool with a bit that has a tiny "ball" tip. This will help to enlarge the crack's sides to create a "V" channel on the crack's edges. Be sure to "drill" past the end of the crack. This will ensure that the crack won't continue to crack thus wrecking the hull further.


Photo #10 Credit: Jeff Hall

As I grind off the sharp edge of the cracked area, I'm working the cracked area into a "V" channel. This will allow me to lay the welding rod into the channel and melt it into place. In doing so, it will heat up the sides of the crack and seal the melted rod into the channel better.


Photo #11 Credit: Jeff Hall

This is what your area should look like when you're done grinding the sharp edge of the cracked area. It will look like a "Y" channel.


Photo #12 Credit: Jeff Hall

Now, the fun begins! Plug in the welding iron and wait about ten minutes. Next, take a welding rod and lay it in the channel.


Photo #13 Credit: Jeff Hall

The really nice thing about this particular plastic welder, is the versatility of the iron's head, which can be used in a variety of ways to shape the molten plastic while you work. Here in this photo, I lay the iron's head down sideways to melt the rod a half inch at a time. It will save you a lot of time doing it this way. If there isn't enough to cover the crack on the first pass, you can always come back later to fill in the gaps you missed.


Photos #14 & 15 Credits: Jeff Hall

Keep working the welding rod into the crack until it's completely filled it. When you're done, you smooth it out as best you can with the iron's head. Added too much? Let it sit for a few minutes, then come back in with the Dremel Rotary Tool to "knock down" the high spots. When you're done, this is what it should look like when you're finished.
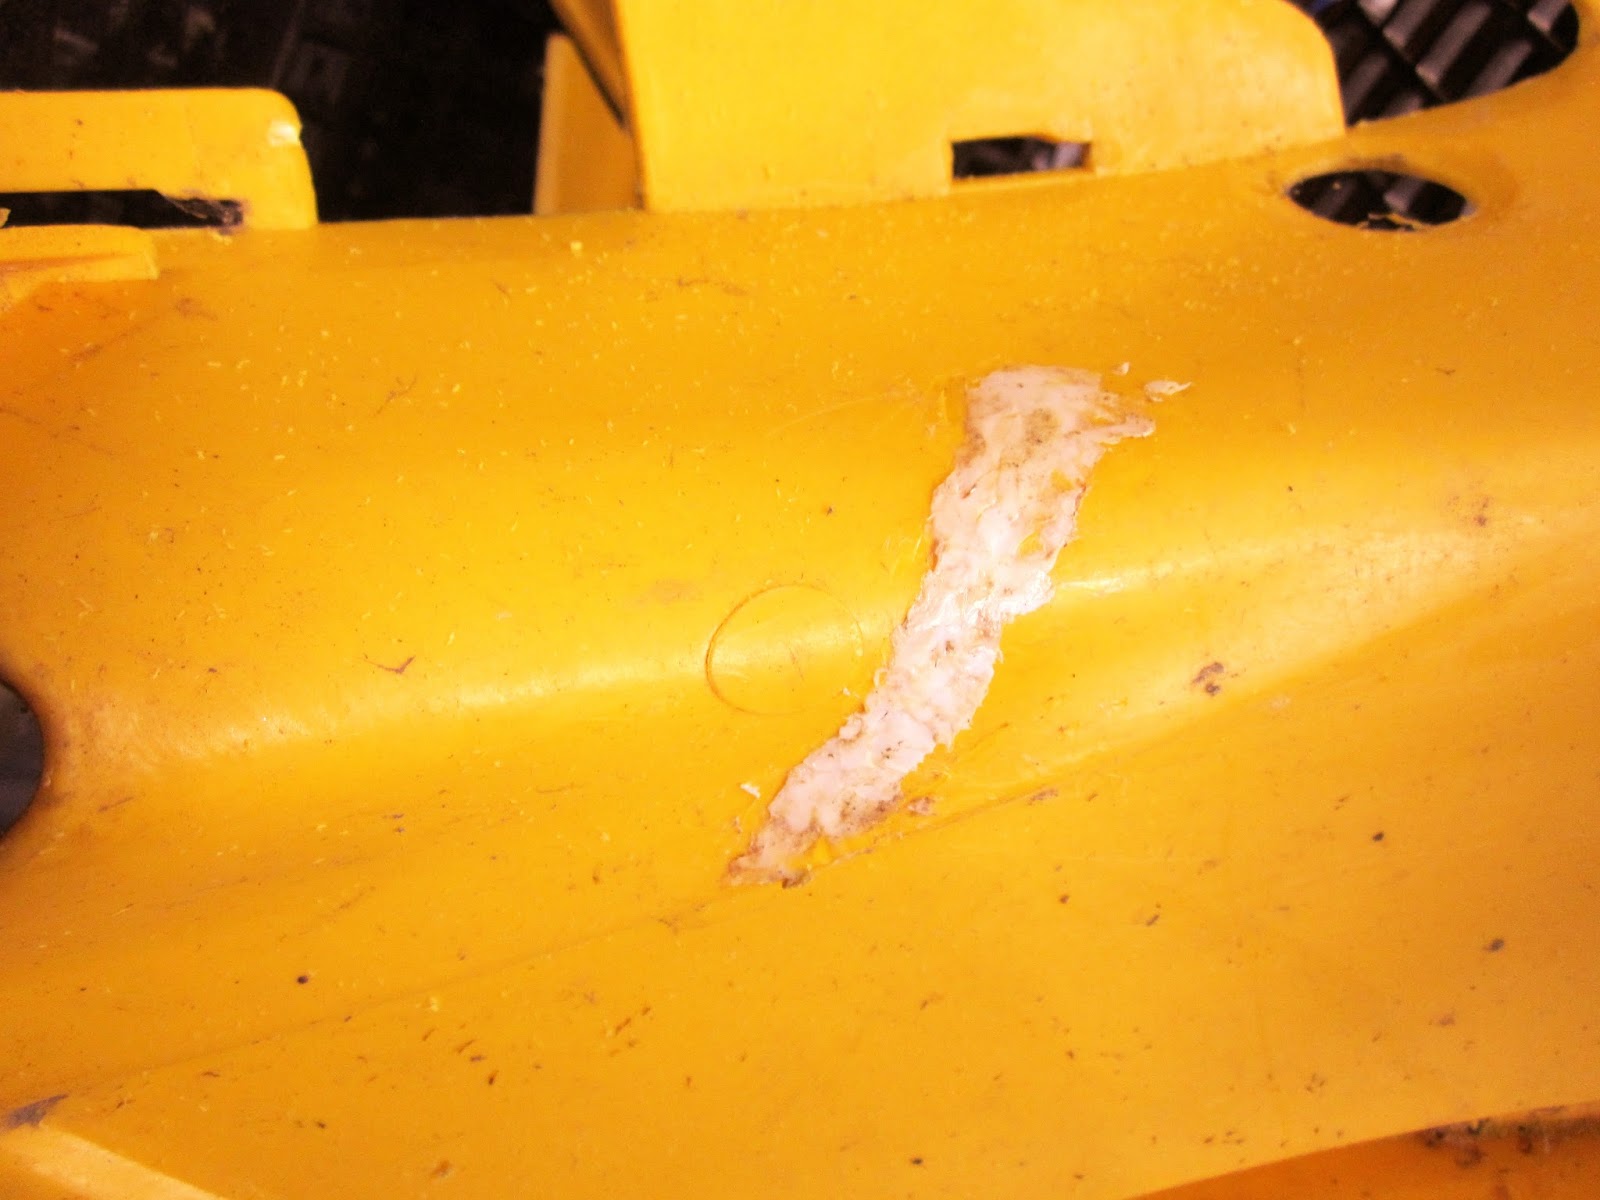

Photo #16 Credit: Jeff Hall

These are the cracks I sealed up on the Feelfree Moken 14 after a few days of work in my garage. The fourth rail didn't need any work, and was left as is.


As you can see, all of the cracks in the hull have been sealed up, and now the kayak is ready for use.

I was shocked to find out that the inside of the hull had saltwater residue and evidence of sea grass INSIDE. The previous owner took a huge risk in using the kayak without fixing the cracks first! It would've been a waste of money should the hull begin taking on water without him even knowing it!

All in all, the sequel to February 2017's blog was a lot of fun to do. And, as with this particular blog, I was able to give better detailed descriptions and provide better photos of what entails when working with a plastic welder. 

As for the material used for welding, you can substitute the welding rod for a plastic milk crate, as it is the same material - polyethylene plastic.

As usual, keep those lines wet & tight! - J


Sunday, September 3, 2017

Fort Adams - Newport, Rhode Island

     One of my favorite spots to fish all year, especially in the Spring, is the legendary Fort Adams State Park in Newport,Rhode Island.


Photo Credit: Billy Black

    Here's a brief bio about Fort Adams:

Largest Coastal Fortification in the United States

Built between 1824-1857

    Originally intended to protect the entrance to Narragansett Bay, Fort Adams provides a visual record of military history from the 1820's to the end of World War II.
    In 1799, the United States erected a brick fortress on this site. By the end of the War of 1812, the first Fort Adams was in disrepair. The burning of Washington during the war had proven the inadequacy of many coastal defenses, prompting the Fortifications Board to study the problem. Fort Adams was selected for reconstruction as a "Class A Work", and Congress made an initial appropriation of $50,000 for the task.  Lt. Col. Joseph G. Totten, the foremost American military architect and engineer of the day, who later became Chief Engineer of the Army, supervised the construction until 1838.  Begun in 1824, the new, third system, Fort Adams was essentially completed in 1857 at a total cost of $3,000,000.
    Fort Adams was designed to defend against both land and sea attacks. Three tiers of cannons protect the East Passage of the Narragansett Bay and extensive earthworks provided protection from land assault. The walls were erected from granite shipped by schooner from Maine, and shale was quarried on site, as well as brick believed to have been made from clay obtained within Rhode Island.
    The Fort was designed to accommodate a peacetime garrison of 200 and a war complement of 2400 with 468 mounted cannons, although at no time was Fort Adams ever armed or garrisoned at full strength. 
    * In May of 1965, the fortification complex and the adjacent waterfront property was given by the Navy to the state of Rhode Island for use as a state park. Since that time the fort has been opened for public use and partially restored. Period guns and carriages are on display. Access inside the old fort is by daily guided tours, mid-May thru Columbus Day, every hour on the hour from 10:00 AM to 4:00 PM.

* Extra special thanks to John Stanton of  FortWiki.com

    Today, it stands stands ready for your enjoyment.


Photo Credit: The Fort Adams Trust

     So, with that said, today it stands as one of my favorite places to fish all year around. Here's how to get there. If you have a GPS for your car, or you have one on your cellphone, enter this address: Fort Adams Drive, Newport,RI


Photo Credit: Google Earth

    The above first photo shows the road Harrison Avenue at the bottom. At the lower left, you will take a right onto Fort Adams Drive, then a right at the intersection at the first tree. Then take the second right (in front of the beach area) which is also Fort Adams Drive still, and make your way down past the old Mule Barn to the deep water launch ramp. If you have a trailer, you will have to park on the right. Pickup trucks and cars/SUVs will park on the left.


Photo Credit: Google Earth

The second photo above gives you better view of the area. It also shows you that this is where Capt. Jim Barr of "Skinny Water Charters" uses this same launch ramp for their guided fishing excursions.


Photo Credit: Google Earth

The third photo above shows you to the right of the park Brenton Cove. All those little specks in the photo show you just how congested it is with fishing boats and sailboats. This is a kayak angler's dream to fish at night! You have two options here. You either fish the cove area, or you can head out up to the point and fish that area as well. 
* * * Author's Note: Please be respectful and stay clear of the other fishermen fishing at the point by not getting to close to them at night. You won't be able to see their tackle or lines flying out towards you. * * * 


Photo Credit: Google Earth

The fourth photo above shows you where the ferries come & go out of the harbor area. The lighter shaded area where the sailboats are clustered seems to be less congested with underwater weeds. I have fished out and around the point to the left of the fort, but you will be pulling up a lot of sea grass/weeds as well. 


Photo Credit: Google Earth

The fifth photo above shows you the tip of the park. The small lagoon area is located at the end of the park, and is usually loaded with small sailboats that you can rent for the day. I have fished this area by down the gangway onto the docks to fish this area at night in the spring. I would recommend NOT to paddle in this area at night. It's too tight an area to turn around in.

    From early Spring, when the emerging sand eels take to the water, small undersized stripers are at the beginning of their feeding frenzy, the Newport Harbor/Brenton Cove area is alive with splashes of striped bass and small juvenile bluefish breaking the surface everywhere your head will allow you to see. It's an awesome sight to see at dusk shortly before the sun sets. The best way to enjoy this is by kayak. Your kayak will get you to where you want to go in between all the sailboats and power boats moored in the harbor/cove. From the cliffs next to the mansions, along the docks, along Wellington Avenue, and all the way past the Fort's point.

    At the opposite end of the park there's a foghorn at the point, if you're shore fisherman, this is also a hot spot for the crowd that likes to fish at night. Some people bring coolers, while others bring a high powered lantern trying to entice some fish to bite their bait. Aside from stripers, fluke, and bluefish, there are also the not-so-popular skate present in the harbor, too. The only problem with this location, is you will have to use a cart or a small wagon, to carry your belongings out to the point. Game Wardens/Park Rangers will also do patrols at night around the grounds and perimeter - and they WILL be checking to see if you have the proper licensing with you.

    If you've never fished this area at night at the end of May to early June, you have no idea what you're missing. This is by far my favorite place to fish in early spring and will continue to be for years to come! Hope to see you there sometime.

    As usual, keep those lines wet & tight!  - J

Tuesday, August 15, 2017

Connecticut Hunting & Fishing Day 2017

     Last year, I had the honor of being part of something special for the state of Connecticut. Here's how it happened:

     My friend lives across the street from someone that works for the Connecticut Department of Energy & Environmental Protection (CT DEEP). We had gone over there to deliver them some eggs (she has 11 chickens), and we were discussing something about fishing, which led to her mentioning that I have a blog page where I mention "DIY/How-to" stuff, and local fishing spots for kayak fishing. I also handed him a few "reminder" cards - which look like business cards but saves me time from cramping my hands writing out the web address and mailing address.

     Anyway, a few weeks go by, and she gets a letter from the state of CT's DEEP about an upcoming outdoor show. I also checked my Google email account, and find an email from the the state of CT's DEEP asking me if I'd like to take part in CT's 6th annual Hunting & Fishing Days. The CT DEEP had two days they were having the events. One on the eastern side of the state at the Franklin Wildlife Refuge (Franklin,CT), and the other on the western side of the state in the Burlington Wildlife Refuge (Burlington,CT).
     The eastern event was the first time it was being held in Franklin,CT, so even though it was a success, not too many people showed up for the event. There wasn't too much going on for the kids to get involved.
     The western side of state was way more successful because this had been their 6th year, and there was a lot of interactive activities for the children to get involved in.
     I was given the first spot on the right heading down the trail. It was the first "booth" the people saw walking down the trail. My Hobie Outback kayak was set up the same way I would be set up as if I was launching in the surf - gear basket, white light with safety mast/flag, red/green navigation light, anchor trolley, foot well lamp, GPS/Chart Plotter/Fish Finder, Beach Wheels, etc.. A lot of people took photos of the way my kayak was set up, noting to each other the "upgrades" I've done to my kayak, and asked how each upgrade is used in conjunction with the ways I fish.

     Now, I'm just an average guy, that "writes" in his spare time about some "how-to" stuff you can do at home, and maybe give up some of my favorite fishing spots, so you can add these hot spots to your arsenal of areas to fish. Any advertising I do comes out of my pocket. I don't have any "paid" sponsors because I fish mostly on a part time basis. Also, I'm NOT endorsed by Hobie, (my kayak of choice at the moment). I'm currently planning to get a longer kayak, but it won't be a pedal driven model. I'm looking at a used 2013 Feelfree Moken 14 - it's 14 ft., 7 in. long, 80 lbs., 450 lbs. weight rating,  and 30 in. wide. A member of our fishing club hurt his shoulder and is now selling this kayak. I had seen it at a "meet & greet" earlier this year and had noticed the structure cracks on the right side of the hull. I knew I could fix this kayak and have a decent spare kayak for offshore fun. Once I get the kayak home, I will begin the task of rigging it to the extreme.

     Anyway, this year's "CT Hunting & Fishing Day 2017" will be for one day only on Saturday, September 23, 2017 at:
 Cabela's
 476 East Hartford Boulevard North
 East Hartford,CT
 from 10 am. to 4 pm..

     Included in this year's show: Hunting & Trapping Tips, Fishing & Boating Displays, Archery Shooting, Fly-Tying & Casting, Hunting & Fishing Clubs, Conservation Organizations, Birds of Prey, Kids Activities, Fish & Wildlife Exhibits, Equipment Vendors, Laser Shot/Dart Gun/Blow pipe, BB Gun Shooting Range, Hunting Dog Demonstrations - ADMISSION & ALL OF THESE ACTIVITIES ARE FREE!

     * Author's Note: I'd like to give Cabela's a huge "Thank You" for stepping up to the plate and sponsoring this show - without Cabela's support, there would not have been a show this year. It's sad how the state's careless spending habits nearly cancelled this year's show, but I feel that with this "new" location being that it's more centralized, I think we will see an increase in visibility to what CT's got in store for it's residents. The parking area here is huge and will allow for more people to attend being that it's located in the "center" of the state.

     I will be in a 10' x 20' covered space, shielded from the sun on the sides, . And, besides my reminder cards, I will also have some cards from Dave Morton of "Beavertail Rod & Reel Service", a member of our fishing club that services our reels, does custom rod repairs, and makes custom equipment from scratch for people who are disabled.
     Additionally, I'll also have a special soap for you to try out that I use after my saltwater outings. It's the only soap that lathers in saltwater. The high calcium content in saltwater won't let standard household soap lather properly.
     It's made locally in the USA by a friend of ours, and their product is called, "Tackle Buddy". You can contact them here on Facebook:
 
     www.facebook.com/TackleBuddySoap/

     So, this is one of the shows that I enjoy chatting with other people about saltwater fishing from a kayak. If you have any questions about the items on my kayak, or where I go for launch spots, just ask. Hope to see you there!

- J

Saturday, July 29, 2017

Love it? Or, Lose it?

    We've all been there at some point. You're sitting out on the water (it could be freshwater or saltwater) having a good day, when all of a sudden, a careless boater (or, jet skier), maybe a rogue wave flips you over, and the gear you've been storing in your gear basket behind your seat becomes dislodged from its confines. Maybe, some of it floats? Other items? Not so much.....

    Fortunately, you had a cover on it........., right???  You did remember to put a cover on your basket, right?  No?  Uh oh!  Looks like you need to start thinking about a cover that will stay on and keep your gear where it's supposed to be!

    Over the years, I've seen some pretty good gear basket designs, and other designs, not as much went into thinking, that the average kayak angler would never think of flipping, or rolling over. It doesn't matter if it's freshwater, or saltwater, there will always be an uncertain future when it comes to an unexpected rollover. Because, no one anticipates a rollover. I would think that's the last thing we want to happen out on the water. For one, it's embarrassing. Number two, it's even more embarrassing trying to get back in your kayak, and lastly, collecting all the items floating on the water - which are scattered all over the place.

    Of course, not everything floats - your anchor, some lures, maybe your long nose pliers, sunglasses, etc.. It would be a shame that the cost of everything you packed your gear basket with, was suddenly lost at the bottom of whatever you're fishing on - a lake, a pond, a river, or even the ocean floor.

    Now, let's take a look at some gear crate designs that some people thought were "good enough" for their uses. The following photos are used for reference only. I'm using these as future references for how to set up your gear crate properly so you don't end up looking like a fool out on the water.

    These 3 photos are all from the same poster on the Kik Messenger #kayakfishing chat room. He is a beginner kayak angler, and this was his first attempt at "dialing it in" on his first SOT kayak.

    Photos 1 & 3 show a pretty cluttered area behind the seat. But, the first thing that caught my attention was the two bungee cords crisscrossed over the top of the crate. Really? Do you think this is a good idea in the event of a rollover?
 
    Photo #2, the clearest photo of the group, shows a lot of "technical" items on the front of the crate - (1 pr.) scissors, (3 prs.) pliers, and (1) knife. Hope he didn't pay a lot for all those items! Notice he has a leash for his kayak handle, but not for any of the items on the crate! I can also see he put foam floats zip-tied to his fishing poles. I can honestly say that those foam float tubes aren't buoyant enough to keep your rods afloat. Those poles, and gear crate, each need to be leashed as well!


    Here's another example of a gear crate with a top. It's a very simple design, but the top cover needs more "hinges" on it. Those green zip-ties aren't going to hold up well in the summer sun. The sun's ultraviolet rays will dry rot those zip-ties in a hurry. There should be at 10 -12 zip-ties across to hold that cover in place. If one or two zip-ties break, there will be plenty more to keep the lid shut should you rollover. Not exactly sure how it stays shut, though.....


    The next photos are of my old "prototype" gear crate. I was on another kayak fishing forum site, and adapted my own tricks to the forum leader's crate idea. I added acrylic plastic panels to the top cover, and the inside top box bottom. I also added a holster for my lip grippers and used an old phone cord acting as a leash to keep it in place. I also added reflective tape on the top box so that people using a searchlight will see the kayak better at night, or in foggy conditions.
    On the front of the crate, I added a Scotty Mount for my mast with safety flag. The mast also has reflective tape near the top for better visibility at night or in dense fog. I also added cheap plastic kitchen cabinet knobs to hold both the lid, and top box in place should you rollover. The strength of the mini bungee cords was strong to hold a 2.5 lb. weight in place ensuring the items inside would not be lost. On the inside of the lower crate, I added a piece of 1" foam on the bottom, so when you return a storage box back on the inside, the sound doesn't scare the fish away with a loud clunk. The foam at the bottom will provide a cushion for your storage boxes.


    So, with that said, if you don't want to lose it, you can either leash it, lash it down, or lose it. It's your wallet. You have to decide for yourself on how much you're willing to spend, and if you feel the need to spend more on quality stuff, or build it yourself, and save a few bucks.

    For more info on how to build a quality gear basket, go here:

Thursday, June 22, 2017

How to Fix a Broken Kayak Handle

    As with everything in life, something is bound to break sooner, or later. Whether or not your kayak has solid plastic handles, or cheaper woven nylon handles, (and depending on old age and/or frequent use) your kayak handle's strength over time will weaken at some point and break at the most inopportune time when you need it the most.

    Such is the case with my friend's kayak handle - a cheap woven nylon handle with a hard rubber grip portion that started to tear near the anchor point. Her kayak is an inexpensive sit-on-top model, a Future Beach Angler 160, with basic components - cheap parts that helped keep the price down making it affordable to own. The only problem with this kind of kayak is that there isn't a dealer nearby that can do this type of work. And, to ask a kayak shop to do this, is very expensive. She is on a limited income, so I stepped up to the plate, and decided to tackle this job myself.


Above photo 1: This handle has seen better days. The rip in the nylon is 80 percent torn. It has served its purpose. But now, it's time for an upgrade!

    I worked in the auto body industry for 7 years before getting hired with the state of Connecticut. So, I have a lot of unique power tools that are perfect for this type of job. It will require some bolt cutting, gas torch use, and plastic welding to attach an aftermarket handle.

    First, I had to cut the handle off so I could get to the screws better. After I cut the handle off, I tried to turn the screws. I used good amounts of WD-40 on both screws and couldn't get the screws to budge. In fact, I put so much torque on the screwdriver's tip, that it mangled the tip of the screwdriver - but it didn't do anything to the screw head itself.


Above photo 2: The mangled tip of the screwdriver after losing the battle with the screw's head.

    My next plan of attack, was to cut off the screw from the bottom, on the inside. I removed the storage hatch cover and took a look inside to see what I'm up against. At first, I thought it was a couple of bolts with lock nuts holding it in place. But instead, they were held in place with a molded fastener - like the nut was in a molded cup built into the kayak's hull itself.


Above photo 3: The view from the inside of the hull. Before cutting these two "knobs", I unplugged the drain cap to the right of the front "knob".

    Here's what I used to get into that tight area: a mini Electric Body Saw. It's like a Sawzall, but it's about 75% smaller than its big brother, which is the perfect tool for the job. It's lightweight design will enable you to get into this tight area while utilizing just one hand to operate it. And, it's only $35!


Above photo 4: This tool sells for just $35, and is probably one of my most widely used tools in my shop. It comes in handy for a variety of projects.

    Whatever bolts the manufacturer used in the assembly process, they were "iron clad", as they were a pain to saw through. They eventually cut through after spending nearly 10 minutes per bolt. I chose to not only cut the bolts, but also the  bulbous plastic lump as well. Trust me, you won't miss it.


Above photo 5: Be persistent in the cutting process, eventually the bolts will give in. You might experience some cramping from trying to get the best angle when tackling that forward bolt.

    Now, I have to prepare the handle's area by filling in the old bolt holes with the plastic welder. I started out by melting down the raised "walls" on either side of the old handle (photo 6).
    Once they were leveled flat, I began filling in the old holes with plastic shavings that were saved from a previous project (photo 7). If you don't have enough plastic material, the plastic from old milk crates makes for a good substitute. The color won't matter because you won't see it once the new handles are installed.


    Above photo 6: Taken before I removed the handle. This shows the raised "wall" area on either side of the handle.


    Above photo 7: Both "walls" on both holes were knocked down to make way for the filling the old holes. After sanding the area with 36 grit sandpaper, I used a propane torch to "smooth" out the rough area. 


    Above photo 8: The old holes were filled in using a plastic welder. I tried to level it out as flat as possible. The above photo shows the area is now ready for re-drilling the new holes to make way for the new handle.

    I wanted the next handle to be as comfortable as possible for her to use. The old handle wasn't as good when it came to lugging the kayak up steep boat ramps. So, I bought this one from a Hobie dealer. It was longer in length, thicker in diameter, and much better quality too. It will also reduce the pain in the user's hands when lugging the kayak over long distance walks to the water.


Above photo 9: This handle came from a Hobie dealer and it wasn't cheap at $20, but comfort is king when it comes to lugging the kayak a good distance to the water. But, that will be up to YOU on what you choose to do when it comes to replacing your old handle.

    I have a bunch of spare bolts, nuts, lock washers, and washers at my disposal for this project. You may want to visit your local hardware store to pick up the parts you'll need for this project. I chose to utilize both the two holes in the front and back of the handle. You will also need a drill, to punch through the webbing material, as well as the plastic hull.
    I chose to fold the end units inward, so they're facing each other when I go to drill the handle bases in. It should look like this when you're done:


Above photo 10: The finished product!  I wanted to keep a small "curve" in the handle by keeping it confined to the recessed space provided. 

In the end, you will have a great looking handle on your kayak that will last for years to come. And, this project will give you a sense of pride in knowing that you did this by yourself while saving your wallet from being raped at the local kayak shop.

As usual, keep those lines wet & tight!  - J

Saturday, May 6, 2017

Custom Kayak Cart for the Beach

   There's a lot of kayak carts on the market today aimed at your kayak, but which one do you choose? Some manufacturers have carts that use ratchet straps and a frame-style cart. While others use a plug-in style cart that utilizes the kayak's scupper holes. That choice will be up to you on what you can afford, and how quickly you want to get out on the water.

   Frame-style carts

    You've seen them. It's usually a bulky contraption with foam padding and basic wheels (a combination of hard plastic ball-bearing free rims and thin airless rubber or hard foam tires). Some of these tires may be air filled. While some of these frame-style carts will either break down for easy storage in your forward hatch, or fold up for storing under your front or rear lashing areas for carrying. A few problems arise with these setups.
 
    First, they're cumbersome to setup under the kayak - especially if you have a fully loaded fishing kayak. Then, you'll have to position it just right so it doesn't fall over, or slip out from under the kayak, while going over uneven terrain. Don't forget to ratchet it down good so it doesn't slip out from under the kayak (but not too much that it warps the hull)!
 
    Second, there's the problem of storing it while you're out. If you choose to leave it at the launch site while you're out, they might, or might not be there when you get back in. Good luck getting back to the parking area.
    You could store it up front in your forward hatch - if it's big enough. For those of you that have kayaks that are 10 feet long, or less, you may not have a cargo hatch area big enough to store a collapsible cart. Or, your cart may not collapse at all. You could try to "lash" it down using the bungee cord material (aka "shock cord") that's usually located either up front, or out back. That's fine for the front, but it may take away from carrying your fishing gear (or, crate) out back.

    Plug-in style carts

    Plug-in style carts are just what they seem. They usually "plug" into scupper holes for easy transport to, and from where you decide to launch from. The nice thing about some plug-in style carts, is that when you get to where you want to launch, where you chose to put the cart after you've pulled it out, is usually the same place you'll put the cart into the scupper holes from the top to take with you. In some rare instances, if you plugged in the cart into the scupper holes located in the seat area, then you may have to find another way to take your cart with you, so it doesn't get stolen.

    Homemade PVC carts

    If you've been on some of the many online forum sites, or even YouTube for that matter, you've seen many different ways someone has made their own kayak cart out of PVC. I'll admit I'm guilty here. I made a few for a friend that resulted in a rather overly bulky cart that was a big pain-in-the-butt when it came to stowing it, or it was a bigger pain when it came to securing it to the kayak for bringing it somewhere. And the cost of materials usually resulted in spending more money, and time, on a project that ended up going to the scrapyard at some point.

 
    So now what?  Well,.....it goes like this:

    I have a friend that has a relatively decent kayak that cost a mere $400, but it is on par with some of the big name kayaks out there. So, over the last few years, I've tried the homemade route on at least 5 different versions of a custom made cart - all of them a failure, to say the least.
    One day, while flipping through a Bass Pro Shops flyer, I noticed a Adjustable Kayak Cart that could be adjusted in width from 10" to 22" wide, and it was nicely priced at $55. It was made by Ascend Products, a top name in kayak accessories with everything from anchor trolley kits, kayak carts, kayaks, clam shell cleats, paddle leashes, etc. - just to name a few.
    I went outside to their kayak, and measured the width between the scupper holes, and finally found a cart that would fit their kayak perfectly.
 
    Over the last few years, our kayak fishing club has had some newer launch sites added to the itinerary that are difficult to get to the shoreline. Though, they are "hidden gems" to our club member's leader, they also require the use of beach wheels on some of the beaches. Because, NO ONE wants drag a fully loaded kayak across deep sand.
    So, I checked into adding a set of Wheeleez beach wheels to their cart. Unfortunately, the Wheeleez hub size on some of their hubs were either too big (10" tire), or too small (6" tire) to fit the cart's axle hub. And a set of their tires was way out the budget range we were looking for. Up to $250 for the larger 10" tires, and up to $180 for the smaller 6" tires. Plus, their hub size was too wide for their kayak cart's axle.

    While reading through my "Kayak Angler" magazine, I came across an ad for Malone Auto Racks. They're a major supplier for everything related to transporting your kayak. Custom built trailers, kayak racks for storage, kayak carts, etc.. American made products from Portland,Maine and in business for the last 18 years. I went to their website here: Malone Auto Racks .
    I checked out the brand new 2017 catalog online (clicking on "Catalog" will open up a new window) and on page 35, Malone now offers their own version of inflatable beach wheels called, "Soft Terrain BeachHauler Wheels", Part# MPG513, and are sold in sets of 2.


Above Photo: Soft Terrain BeachHauler wheels. Photo courtesy of MaloneAutoRacks.com

    After speaking with regional agent at a recent trade show, he said that the set of 2 wheels w/hubs would be selling for $100. We brought an Ascend kayak cart with us and tried on one of the BeachHauler wheels. It was possible with the unique "deep dish" design of the rim. The Ascend adjustable kayak cart's outside axle length is only 4" long with a small press in button at the end to help keep the hub in place on the axle.


Above Photo: Deep dish rims like these will be a different color on the BeachHauler wheels. Photo courtesy of MaloneAutoRacks.com 

    Although it was an extremely snug fit, this is EXACTLY what we're looking for! This would bring the price for the cart & wheels to just under $160! And the best part? Even YOU can "build" this project will no tools needed!

    So, if you're looking for a set of beach wheels, and a great way to transport your kayak over deep sand, then check out these two great options - Ascend Product's "Adjustable Kayak Cart", and Malone's "Soft Terrain BeachHauler Wheels".


    As usual, keep those lines wet & tight!  - J


Monday, February 13, 2017

How to Use a Plastic Welder to Fix a Cracked Kayak Hull

    There are a lot of things that can go wrong in life when dealing with your kayak's hull. Take for instance, a recent "upgrade" I tried to do with my kayak.

The story:
    About three years ago, I had an Eagle Cuda 350 (Sonar/GPS), a small, gray scale, entry level fishfinder with GPS. It served me well for about 3 years during the day, but I mainly used it at night to help me find my way back to the boat launch area. But, there came a time when I needed it the most, and it failed to start - even after I had just finished charging the battery.
    So, I finally caved in and got a Lowrance Hook 5 DSI fishfinder/chartplotter/GPS. It was like stepping into the future with this new unit. It has a much larger 5" viewing screen, color display, a micro SD card with 6000+ lakes pre-loaded for all 50 states, and a state-of-the-art GPS system. It also came with a much larger transducer measuring in at 2" wide and 4" long - way bigger than the previous version. The way I had my transducer set up, it shot through the hull. This setup provided protection from the rocky bottom and other underwater obstructions that couldn't be seen by my eyes -  day or night. The transducer sat in 2 foam spacers that were doubled up together and affixed to the inside of the kayak's hull using Marine Goop. I would fill the spacers with water, then press my transducer in slowly to squeeze out the excess water and air bubbles, to give me a solid reading every time. But, with the bigger transducer, it wasn't going to fit my spacer setup. So, in order for me to make a new spacer, the old spacer setup had to come out.
    I figured I would use a scraper first, to see how that goes, then switch to something heavier duty later. I knew Marine Goop was pretty durable, but instead, it was harder than a rock. The fact that the air temperature in my unheated garage is around 30 degrees doesn't help. The scraper just wasn't cutting it. So, I switched to a heavy duty chisel, and a small ball peen hammer to help scrape away the spacer blocks. At first, it was going pretty smoothly, but then the inevitable happened - I thought I was making headway, but I ended up driving the chisel completely through the bottom of my kayak, tearing a 3" gash in the hull! While I'm usually patient at doing things to my kayak, I'm pressed for time for an upcoming saltwater show in early March, so my impatience led to me trying to cut a few corners, and it cost me by compromising the hull.

The solution:    
    But, being a former auto body technician, I have a remedy to this unlikely situation. While most people would've freaked out, and possibly thrown away their damaged kayak in the garbage. There is a cheap alternative that will save you a ton of money and it's called a Plastic Welder.

So, let's get started:
    If you've never heard of a plastic welder, they're usually used in auto body shops to repair front and/or rear bumper covers on today's newer cars. Some plastic welders can cost several more dollars, but this one that I have costs around $17, and it's a decent 80 watts, more than enough to get the job done. It was purchased at Harbor Freight


    The nice feature about this model of the plastic welder is the flat triangular head that makes it act like a very small iron (much like its big brother that you use to iron your dress shirts with). This will enable you to smooth out the plastic better.

    Because I've already sealed the crack in my Hobie kayak's hull, I'm going to use a scrap piece of plastic that I found at the transfer station. The piece in question came off an old Honda Quad (a fairing vent, I think). 
    
    Anyway, let's pretend that this is a crack in the kayak hull. Yeah......., it looks pretty deep.

   
    Above photo: from the front.


    Above photo: from the back.

    Okay, after assessing the damage, you want to get a screwdriver, and from the back (or, bottom of your hull) you want to press the raised edge back in so that it's "level" again. The nice thing about a kayak's hull is you can flip it over to work on it.

    Then, once you get it as close to level that it was, you take a razor knife and slice a thin piece off the exposed raised edge. This should form a "valley", or a V-like channel that you're going to fill in.


    Above photo: Prepping the "valley" for a fill in.

    Using the previous piece of plastic that you trimmed off earlier with that razor knife, you're going to use that piece to fill in the crack. Lay the trimmed piece in the valley, and with smooth strokes, melt the piece into the valley. 
    You'll know when the plastic welder is hot enough when the plastic begins to melt under the head of the iron. 

    (As seen on the Plastic Welder's carton in the above photo)
* DO NOT, FOR ANY REASON, TOUCH THE CHROME AREA ABOVE THE HANDLE! *

    * Note: DO NOT leave the iron in one spot! Keep moving it around so it doesn't burn through!


    Above photo: Melted plastic piece inside the valley.

    If you need more plastic to really completely fill in the damaged area, you can use an old milk crate. It's made of the same material as your kayak. But, instead of stealing a milk crate, you can buy one here (to match your kayak's color): The Container Store - Milk Crates

    To get the plastic shavings you need, you can use different size drill bits make the shavings you need. Small drill bits will make thinner and stringy shavings. While larger drill bits will make thicker and longer shavings. Color shouldn't be a big concern. You're filling in a crack that nobody will see.


    * Tip: In the photo below, when filling in the valley with the desired plastic, to keep the plastic "clean" and not to have it discolor the area by turning black, you should use the small wire brush (provided) to clean off the iron's head frequently. As the plastic melts, the built up melted plastic will burn on the end of the iron's head causing it to turn a blackish color, further discoloring your damaged area.


    Above photo: Patched area discolored from a dirty iron's head. Clean the head with a wire brush frequently, so as to do a nice clean patch job.

    To strengthen the back (or, inside hull) of the damaged area, repeat the same process.

   
    Above photo: After the welded patch is complete, you have a nice weld that is waterproof inside & out.

    When you're finished, unplug the plastic welder and set it on the angled metal rest provided, (preferably on top of a piece of scrap wood board) and keep it away from anything flammable while it slowly cools down.


    Above photo: Using the metal rest provided, this will make it easier to keep the iron clean.

    If you need more practice, use some old milk crates. Pretty soon, you'll be plastic welding everything in sight - helmets, kayaks, bumper covers, water jugs, etc.. Be sure to save the scrap milk crates when you're done cutting them up. You never know when you'll need them. I have lots of containers with scrap & colored shavings from all kinds of "donor" plastics, such as ATV/Dirt Bike fenders and scrap milk crates. So far, I have shavings in the following colors: Red, Yellow, Orange, Black, Grey, and Olive Green.
    I hope this "How-To" article is helpful to you and your friends in making the right decision to save money on a simple fix, rather than to spend several hundred dollars on buying new equipment. That way you'll have more money to spend on better fishing equipment.

    As usual, keep those lines wet and tight! - J